|

|
|||||||||||


|
DON'T CUT THE USB CABLE! |
You can unplug it
from the PCB to make your work easier, but don't cut it. If the white sleeve comes
off with the plug, slide it back down on the pins and super-glue it to the PCB so it won't
happen again!
Here's the hard part: You need to de-solder the pot from the center of the main PCB.
A copper de-soldering braid makes this job easier. Place the end of the braid
over the pot connections on the back side of the PCB, and apply your soldering iron over
the braid and allow it to soak up the solder for a few seconds. Repeat until you've
removed most of the solder from the 3 pot connections. Now, just heat one connection
for a few seconds at a time, slowly prying the pot off the other side of the PCB.
Alternate between heating the 3 connections until the pot finally squeaks free of
the board.
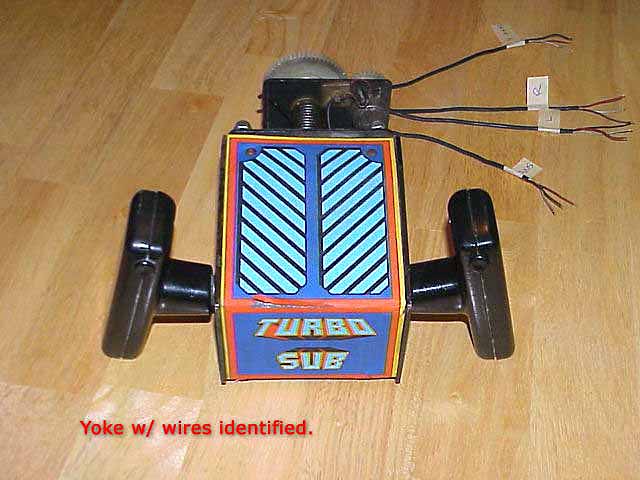
Now you'll need to identify the connecting wires on your analog arcade control. On
the Star Wars yoke, there are 4 sets of red, black, and white wires--2 for the triggers on
the right and left handles, and 2 for the x and y-axis pots. If you have a set of
torx security wrenches (http://www.therealbobroberts.com/
has a nice snap-in set for cheap) you can open the center plate on the yoke, and tug on
each set of wires so you know which is which.
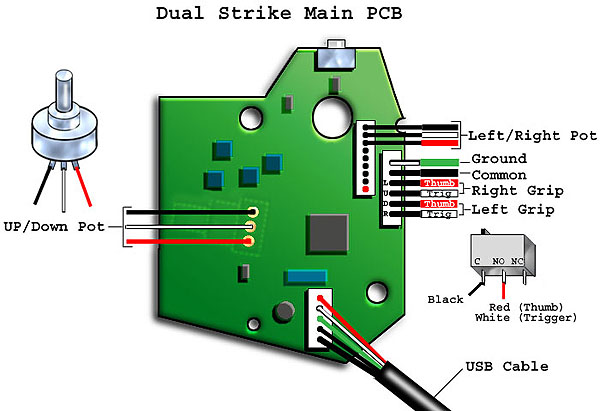
Then wire the connections as shown above. You'll need to solder the wires for the
Y-axis pot to the PCB (where the old pot used to be) but the rest you can just twist
together with the existing PCB wires, solder together and insulate the connections with a
drop of hot-glue or some heat shrink tubing. NOTE: If you're doing a
gun setup, swap the red and black wire connections on the PCB for the Y-axis
pot. This is because the gun uses a flipped Y-orientation (up=up,
down=down) opposite from the yoke's orientation (up=down, down=up).
Note, the connection labeled Ground above should connect to the green ground wire bolted
to the yoke's chassis. Only the connection labeled Common above should be used to
make the connection with the commons (black wires) from the microswitches.
Also, the white microswitch wires are for the triggers, while the red wires connect to the
thumb buttons on each handle.
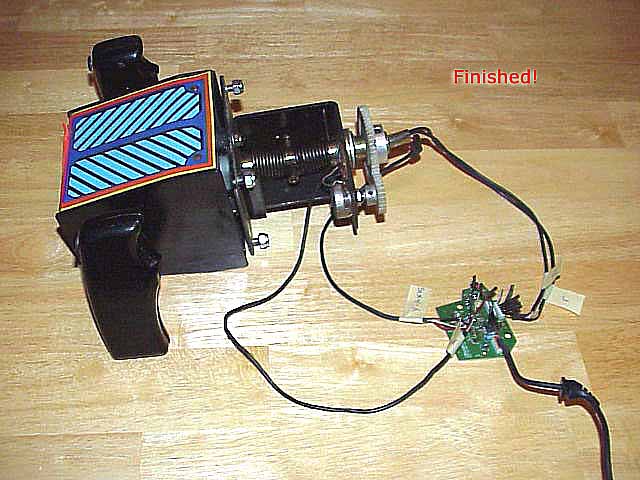
Now, re-connect the USB plug to the PCB, use the screw holes to attach the PCB to a
convenient spot inside your control panel, install the DS software and drivers, and you're
ready to go!
The buttons are actually connected where the D-pad on the DS used to be. In your DS
config, change your keystrokes for UP, DOWN, LEFT and RIGHT to be CTRL, ALT, Space and
Shift, in whatever order you prefer. Set up Mame for sensitivity, axis swapping etc,
and get ready to experience authentic arcade action as it was meant to be!
Photos courtesy of Kelsey at Oscar Controls.
The information on this site is for the purposes of education and entertainment only. The owner of this site makes no warantees as to the accuracy of the information, and takes no responsibility for any damage or injury sustained due to the use of information herein. The design of the Pac-Mamea cabinet and all photos, computer renderings, drawings, schematics, and printed information relating to such are Copyright © 2005 Robert Meyers. No ownership of other copyrighted material found on this site is implied.