Controller Config Files
What Are They For?
The controller specific config files are designed so that you can configure the abundance of controllers available on the market to work with MAME. If you consider that you can get up to 14 buttons on a controller, multiple sticks and dpads, you can configure each one to do something in MAME. You can even make specific controller config files that work exclusively on individual games or systems.
MAME config files use XML and so are not for the beginner but are incredibly useful if you have special controllers.
The Easy Way :)
Here's a little shortcut for all of you not brave enough to read the whole section (Head Hurt Already?) O.K. to save time you can load the game you want to remap into MAME, remap the controls in the in-game menu (press tab and go to Input (this game)). Exit the game and Mame will save a config file in the cfg folder in your Mame folder. What you can do is open the config file (named gamename.cfg) and copy / paste the changed keys into your controller config file. This saves trying to work out the names for your controllers function and writing all those lines of code. (Note: make sure that you delete any <counter> and <mixer> commands that may be copied)
The Hard Way :(
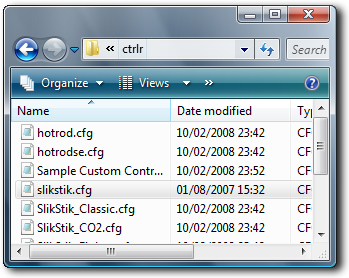
Open up the C:\Mame\ctrlr folder. It will look something like this...

As you can see the configurations are now held in files not folders.
You will see the XML files for the controllers which are saved with a .cfg extension . Now a .cfg file normally doesn't have a default application to open it and if you have MS Outlook it'll default to that (which is a pain!), You'll need to open it in Notepad to edit a .cfg file. You'll find notepad in the Start -> All Programs -> Accessories menu. Open it up and in the file menu select open. Find your MAME/MameUI folder and open the ctrlr folder. You won't see anything there until you change the Files of Type option to all files. You can now open up a controller file to have a look...
<mameconfig version="10"> <!-- HotRod SE input configuration file --> <input> <port type="UI_UP"> <port type="UI_CONFIGURE"> <port type="START1"> <port type="P1_JOYSTICK_UP"> <port type="P1_BUTTON1"> <system name="neogeo"> </mameconfig> |
As you can see it's quite (OK VERY!) complex at first glance but it is very structured so once you've worked out the structure its as easy as normal controller ini files (Still quite complex then!) It also looks worse on this page as the tabbing is lost!
OK... the basic structure. First of all the config files are read by MAME from top to bottom so every time you add a system to the config it overrides the other previous ones. For example a config file with some default commands, some m72 driver commands and say r-type specific commands would need to be set up with default first, m72 second and r-type last as otherwise commands will get overwritten as Mame loads them. Confused? You will be... To sum up go default, drivers, games. That's it.
Here is a simple controller file....
| <mameconfig version="10"> <system name="default"> <!-- Test input configuration file --> <input> |
What it does is use the start button on my Wingman Cordless controller as the player 1 start button. All I have to do is save it as Wingman.cfg and I can use it in Mame either from the command line option -ctrlr Wingman or from Mame32's Controller config window.
Let's have another look and I'll explain a bit more...
| <mameconfig version="10"> <system name="default"> <!-- Test input configuration file --> <input> |
If you look you cand see that for every command it has a start and an end. For example <input> is always followed later by </input> to close the command (note the backslash / on the close). This is fairly standard format for programming and html too. The trick is to use a single tab for every opening command and a tab back for every closing command as this helps you keep track of the commands.
The first line <mameconfig version="10"> just tells Mame that this is a config file.
The second line <system name="default"> sets which game system or game the config file will affect. Default affects all games but you can use driver or game names too.
The third line <!-- Test input configuration file --> is a comment on the file and doesn't affect anything. You can type what you want between the <!> as long as you have the exclamation mark.
The fourth line <input> tells Mame that an input command will be changed.
The fifth line <port type="START1"> sets the command that will be changed. You can see a list below of commands extracted from the old ini files, I think most are covered there.
The sixth line <newseq type="standard">KEYCODE_1 OR J1_Button_9 give the key press or controller movement to be used for the previous lines command.
The seventh line </newseq> closes the newseq command. Normally you'd put it at the end of a newseq line but I moved it down to help explain it.
The eighth line </port> closes the port command so that any more lines wont affect that command.
The ninth line </input> closes the input command for the system stated above it.
The tenth line </system> closes the named system off so you can add another system to the cfg file if you want to.
The eleventh and final line is </mameconfig> . This is always the final line as Mame wont read any further when it reads this.
There is another command <remap> which is used like this...
<remap origcode="KEYCODE_UP" newcode="KEYCODE_8_PAD" />
From what I can make out it will take the command in origcode and use it for the command used in the newcode too so one change will affect two codes (This might be completely wrong though)
Thats about it for XML based cfg files so far but keep reading down the page as all the commands and movement names are there and you'll need to know about them too.
These are the key codes supported in MAME...
| KEYCODE_A KEYCODE_D KEYCODE_G KEYCODE_J KEYCODE_M KEYCODE_P KEYCODE_S KEYCODE_V KEYCODE_Y KEYCODE_1 KEYCODE_4 KEYCODE_7 KEYCODE_0_PAD KEYCODE_3_PAD KEYCODE_6_PAD KEYCODE_9_PAD KEYCODE_F3 KEYCODE_F6 KEYCODE_F9 KEYCODE_F12 KEYCODE_MINUS KEYCODE_TAB KEYCODE_ENTER KEYCODE_BACKSLASH KEYCODE_STOP KEYCODE_INSERT KEYCODE_END KEYCODE_LEFT KEYCODE_DOWN KEYCODE_MINUS_PAD KEYCODE_ENTER_PAD KEYCODE_LSHIFT KEYCODE_RCONTROL KEYCODE_SCRLOCK KEYCODE_LWIN JOYCODE_1_LEFT MOUSECODE_1_BUTTON1 KEYCODE_NONE |
KEYCODE_B JOYCODE_1_RIGHT MOUSECODE_1_BUTTON2 CODE_NONE |
KEYCODE_C KEYCODE_F KEYCODE_I KEYCODE_L KEYCODE_O KEYCODE_R KEYCODE_U KEYCODE_X KEYCODE_0 KEYCODE_3 KEYCODE_6 KEYCODE_9 KEYCODE_2_PAD KEYCODE_5_PAD KEYCODE_8_PAD KEYCODE_F2 KEYCODE_F5 KEYCODE_F8 KEYCODE_F11 KEYCODE_TILDE KEYCODE_BACKSPACE KEYCODE_CLOSEBRACE KEYCODE_QUOTE KEYCODE_COMMA KEYCODE_SPACE KEYCODE_HOME KEYCODE_PGDN KEYCODE_UP KEYCODE_ASTERISK KEYCODE_DEL_PAD KEYCODE_PAUSE KEYCODE_LCONTROL KEYCODE_RALT KEYCODE_CAPSLOCK KEYCODE_MENU JOYCODE_1_UP MOUSECODE_1_BUTTON3 CODE_OTHER |
If you notice there are a couple of types above. You have...
KEYCODE = This refers to a key on your keyboard. You will see which one next to it.
JOYCODE = This refers to a joystick movement or button press and what joystick number to use.
MOUSECODE = This refers to a mouse button click.
KEYCODE NONE = This is used if you don't want to associate any key with a control
CODE_NONE = Same as above.
CODE_DEFAULT = Uses the Mame default key
CODE_OTHER CODE_PREVIOUS = Not Sure Yet!
CODE_NOT or ! = Stops a specific key combination being read e.g If you want to disable the Alt-Tab that opens a full screen use...
KEYCODE_LALT CODE_NOT KEYCODE_TAB
or
KEYCODE_LALT ! KEYCODE_TAB
CODE_OR or | = Lets you add more than one key for a control command e.g. Player 1 Fire using the CTRL key and Joystick Fire Button 1 is...
KEYCODE_LCONTROL CODE_OR JOYCODE_1_BUTTON1
or
KEYCODE_LCONTROL | JOYCODE_1_BUTTON1
SPACE = If you just leave a space between codes it will perform both codes at the same time e.g if you wanted to define a key for a down-left motion on a controller use...
JOYCODE_1_DOWN JOYCODE_1_LEFT
Now for the controls you can change.
|
UI_CONFIGURE UI_RESET_MACHINE UI_FRAMESKIP_INC UI_SHOW_PROFILER UI_UP UI_RIGHT UI_PAN_UP UI_PAN_RIGHT UI_LOAD_STATE UI_SAVE_CHEAT START1 START4 COIN3 SERVICE2 TILT P1_JOYSTICK_UP P1_JOYSTICK_RIGHT P1_BUTTON3 P1_BUTTON6 P1_BUTTON9 P1_JOYSTICKRIGHT_DOWN P1_JOYSTICKLEFT_UP P1_JOYSTICKLEFT_RIGHT P2_JOYSTICK_UP P2_JOYSTICK_RIGHT P2_BUTTON3 P2_BUTTON6 P2_BUTTON9 P2_JOYSTICKRIGHT_DOWN P2_JOYSTICKLEFT_UP P2_JOYSTICKLEFT_RIGHT P3_JOYSTICK_UP P3_JOYSTICK_RIGHT P3_BUTTON3 P4_JOYSTICK_UP P4_JOYSTICK_RIGHT P4_BUTTON3 P1_PEDAL P2_PEDAL_EXT P4_PEDAL P1_PADDLE P2_PADDLE_EXT P4_PADDLE P1_PADDLE_V_EXT P3_PADDLE_V P4_PADDLE_V_EXT P1_DIAL P2_DIAL_EXT P4_DIAL P1_DIAL_V_EXT P3_DIAL_V P4_DIAL_V_EXT P1_TRACKBALL_X P2_TRACKBALL_X_EXT P4_TRACKBALL_X P1_TRACKBALL_Y P2_TRACKBALL_Y_EXT P4_TRACKBALL_Y P1_AD_STICK_X P2_AD_STICK_X_EXT P4_AD_STICK_X P1_AD_STICK_Y P2_AD_STICK_Y_EXT P4_AD_STICK_Y OSD_1 OSD_4 |
UI_ON_SCREEN_DISPLAY UI_SHOW_GFX UI_THROTTLE UI_SNAPSHOT UI_DOWN UI_SELECT UI_PAN_DOWN UI_TOGGLE_DEBUG UI_ADD_CHEAT UI_WATCH_VALUE START2 COIN1 COIN4 SERVICE3 P1_JOYSTICK_DOWN P1_BUTTON1 P1_BUTTON4 P1_BUTTON7 P1_BUTTON10 P1_JOYSTICKRIGHT_LEFT P1_JOYSTICKLEFT_DOWN P2_JOYSTICK_DOWN P2_BUTTON1 P2_BUTTON4 P2_BUTTON7 P2_BUTTON10 P2_JOYSTICKRIGHT_LEFT P2_JOYSTICKLEFT_DOWN P3_JOYSTICK_DOWN P3_BUTTON1 P3_BUTTON4 P4_JOYSTICK_DOWN P4_BUTTON1 P4_BUTTON4 P1_PEDAL_EXT P3_PEDAL P4_PEDAL_EXT P1_PADDLE_EXT P3_PADDLE P4_PADDLE_EXT P2_PADDLE_V P3_PADDLE_V_EXT P1_DIAL_EXT P3_DIAL P4_DIAL_EXT P2_DIAL_V P3_DIAL_V_EXT P1_TRACKBALL_X_EXT P3_TRACKBALL_X P4_TRACKBALL_X_EXT P1_TRACKBALL_Y_EXT P3_TRACKBALL_Y P4_TRACKBALL_Y_EXT P1_AD_STICK_X_EXT P3_AD_STICK_X P4_AD_STICK_X_EXT P1_AD_STICK_Y_EXT P3_AD_STICK_Y P4_AD_STICK_Y_EXT OSD_2 . |
UI_PAUSE |
Heres breakdown of these commands
UI = A command used by Mame in its user interface e.g. in-game menus / save states etc...
JOYSTICK = A control movement by an arcade joystick or button.
PEDAL = A footpedal on an arcade cabinet
PADDLE = A paddle could be twisted approx. 180 degrees
DIAL = A dial can be turned as much as you want.
TRACKBALL = A ball that a user span to control a character. e.g. used in Marble Madness
AD_STICK = Analog joystick controls
OSD = On screen display functions.
_EXT = The reverse of a controller e.g. P1_PADDLE = Left Movement P1_PADDLE_EXT = Right Movement
There are a couple of other commands for lightguns etc... but you'll need to find them for yourself.
Using Your Config.
To use your config in the command line version of MAME you will need to add the ctrlr option to your command line e.g.
Mame puckman -ctrlr wingman
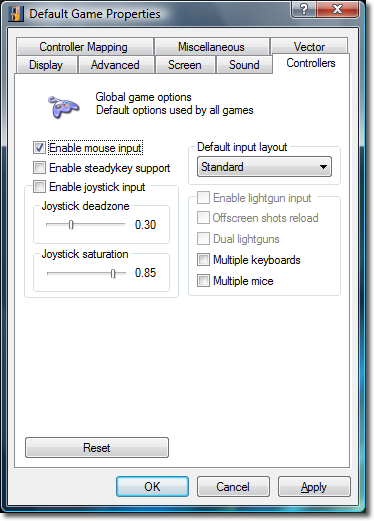
In MameUI go to the Default Options and select the controllers tab. You can select your controller from the "Default input layout" option halfway down. Once selected MameUI will use it and any game specific files you've created by default.

IMPORTANT! There is one last thing you need to remember, If you change a key in the Mame UI itself and not using an ini file, it is stored in the cfg folder. Changing keys in the MameUI does not affect the ini files. With this in mind, If you muck things up by using the in-game menus you will need to delete the default.cfg file and more than likely the gamename.cfg (replace gamename with the name of the game you've shagged up) to correct the error.