Setting Up WinUAE
There are hundred of settings on the WinUAE interface and it can be quite a daunting task to set up. What I will try and do is to give you an idea of what each setting does and then a couple of examples that I use for compatibility.
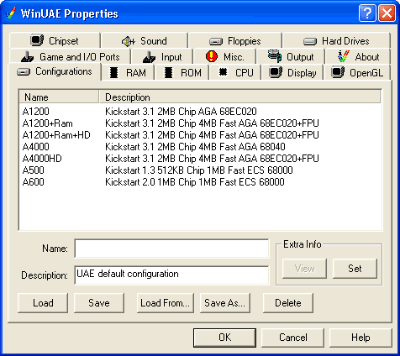
Here is what you see when when you first load up WinUAE...

This screen lets you save and load different configuration files that you set up. You can set up as many different configurations as you need. What you will probably find is that for some games you will need a separate configuration file from your default ones.
To save a configuration all you need to do is to enter a name and description and press the save button. To load a file all you need to do is to select it from the list and press load. As you can see I've set up some configs of my own.
RAM Tab
If you click the Ram tab this is what you'll see...
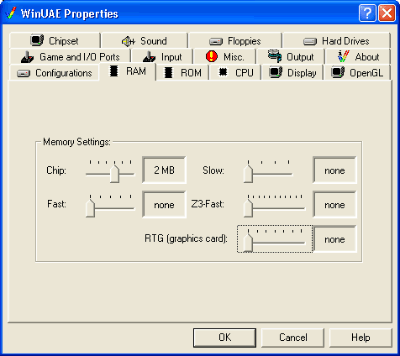
There are five (yes five!) different types of memory that the Amiga could use. Each one has its own effects and uses and can affect the correct emulation of games quite considerably.
Chip Memory - This is the memory that the Amiga used for storing graphics and sound information although it was a little slow.
Fast Memory - Alot faster than chip memory but had the restriction of only being able to store programs. Using it can speed up an Amiga considerably.
Slow Memory - Only used in older Amigas and is used for compatability.
Z3-Fast Memory - Simulates the memory that was attached to a slot in card used on Amiga desktop machines.
RTG - Real Time Graphics memory is used in the emulation of a Picasso 24bit graphics card which is great when used in conjunction with Workbench (the Amiga operating system) and most graphics programs. The picasso cards requires special drivers and software to run. You can get them from here.
ROM Tab
Roms are where the Amiga stored most of its operating system and commands. There were several revisions of the rom files for different machines and certain software would only work on certain rom versions so beware. The Rom tab is quite an important screen as it is where you set up the rom file that you will be using to run your software with. This is what you see...
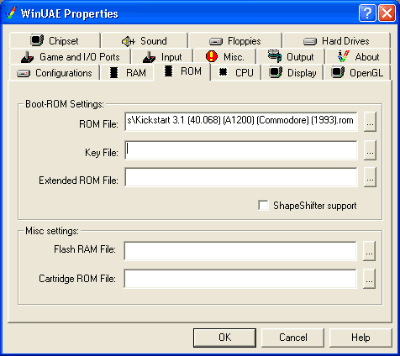
All you need to do is to click the button next to the rom file text box and find the kickstart rom that you want to use in the file window that opens.
Boot ROM Settings
The keyfile is only used if you have downloaded Cloanto's Amiga Forever which contains everything you need to run an Amiga if you've never owned one.
The Extended ROM file is used for the extra rom used in the CD32 console.
The shapeshifter support button is there if you want the emulator to run the Macintosh emulator for the Amiga called shapeshifter. (Yes an emulator running on an emulator!).
Misc Settings
Flash ram file is a file used to save games for the CD32.
Cartridge rom file lets you load up Action Replay 2 & 3 cheat roms.
CPU Tab
The CPU was the heart of the Amiga. By todays standard they were amazingly slow (e.g. the fastest CPU in an Amiga was 25mhz). You need to be careful when selecting a CPU as there are compatability issues with certain games. The best thing to do is to match the CPU to the Amiga Machine you want to emulate.
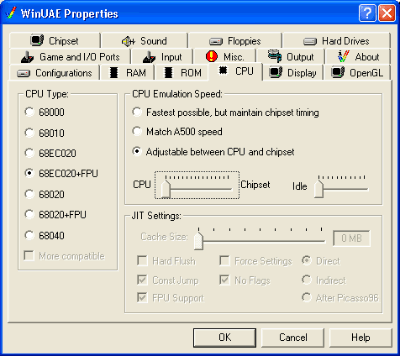
This is the CPU screen...
CPU Type
This part lets you select which type of CPU (main processor) that WinUAE will simulate during emulation. The A500 and A600 used the 68000, the A1200 used the 68EC020, the A2500 used the 68020 and the A4000 used the 68040 processor.
The higher the processor you select, the faster the "virtual" Amiga will be. The overall speed of WinUAE is governed by the speed of your processor however for most game you can use the 68000 processor. If you want to run an AGA game designed for the A1200 then use the 68EC020 processor. The FPU options are for a chip called a Floating Point Unit which has the sole purpose of doing calculations on numbers with decimal places. This helps if you are using 3D rendering programs, fligh sims or anything that uses maths.
The more compatible box will improve the compatability of the 68000 CPU but at the expense of a bit of speed.
CPU Emulation Speed
The Fastest possible option will run the emulator at its maximum speed whilst maintaining the accurate simulation of the Amiga custom chips.
Match A500 speed will set the speed of all processes to the exact speed of the Amiga A500 computer. This can help with compatability problems.
The last option lets you adjust the emulator so as to concentrate more on CPU emulation or offset it against the emulation of the amiga custom chips. This slider can help if you find you are having choppy graphics or sound on some games. It can also be used to speed up certain games that even on an original Amiga gave poor performance.
JIT Settings
The JIT settings are used to make a place in your systems memory for WinUAE to process the conversion of the 68020 and '040 CPU instructions thus speeding them up.
Display Tab
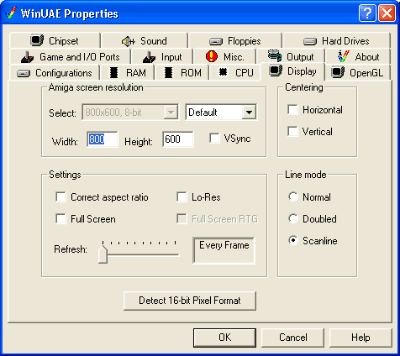
Here is the screen that you'll see when you open the display tab...
Amiga Screen Resolution
The screen resolution section is where you set up the size of the window or the resolution of the fullscreen. You can only use the Select dropdown menu if you have selected the Full-Screen checkbox below it. The width and height boxes will affect the size of the window opened. You can change these if you want to match the window to the chosen Amiga resolution.
Settings
In the settings part you set up how and where the screen is drawn. The correct aspect box will make sure that the screen drawn will always be the correct shape. Low res will force WinUAE to use a low resolution screen. Full-screen draws the WinUAE display using the whole screen and not in a window. Fullscreen RTG uses the full screen but also enables the support for the emulation if the Picasso 96 24Bit graphics card.
Line Mode
This box sets up some effects that can be used. Normal is well... normal. Doubled actually doubles the size of the pixels that are drawn which is useful on higher resolution screens. Finally the scanline option simulates the lower resolution of a TV by drawing alternate lines.
Centering
Err... centers the screen.
Detect 16-bit Pixel Format
This button will check that your system can display WinUAE correctly.
OpenGL Tab
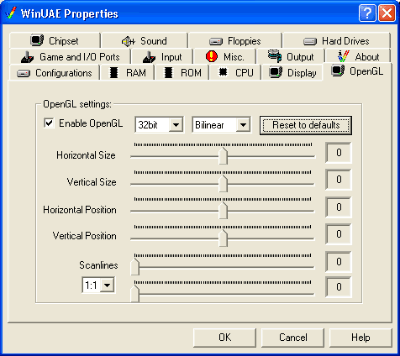
This is one of the best features in WinUAE as it lets you resize the screen whilst the game or program is playing. It uses your 3D card to do this so it doesn't affect performance at all. WARNING! dont use 32Bit if you have a 3DFX card less than a Voodoo 4.
Chipset Tab
Chipset
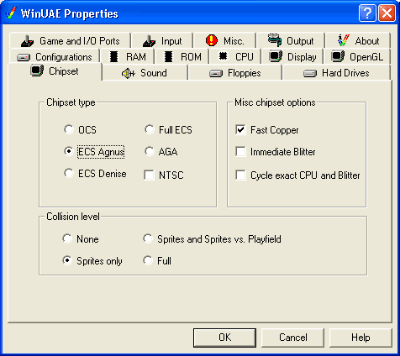
In the Amiga there were several revisions on the graphics chips. Thoe original set was called OCS (original chip set) which allowed screen of 2,4,8,16,32 and Ham (c. 4096 colours). Then there was the ECS (enhanced chip set) which added a 64 colour mode called extra-halfbrite which took a 32 colour screen and halved the brightness of the colours giving 64. Finally there was the AGA (advanced graphics architecture) chip set which was more like the PC VGA setup of 2,4,8,16,32,64,128,256 and Ham8 (c. 250000 colours).
You will need to decide which chipset to use depending on the game that you want to play. The best settings are the ECS and AGA options as the OCS still has bugs in it.
The NTSC box is for emulating the TV standard for US Amigas. It is also great on some PAL games as it speeds them up by 17.5%.
Collision Level
The Collision level box is for sprite collisions which is used to help the interaction of game graphics on some OCS games and immediate blits which is again for compatability but this time in chip sets.
The last few buttons are for compatibility
Immediate Blits - Most programs don't care whether this is enabled or disabled but some demos rely on blits (Screen refreshes) for timing.
Fast Copper - A much improved copper chip emulator but it may have bad effects on collision detection in some programs.
Cycle Exact CPU & Blitter - Makes WinUAE match the CPU and blitter graphics chip timing exactly (Can be slow)
Sound Tab
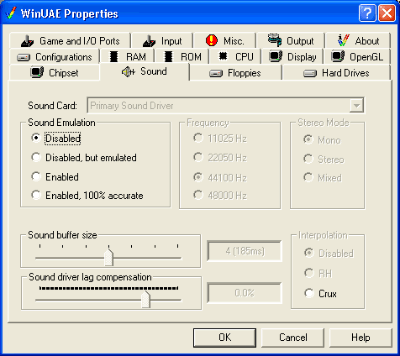
Here is what you see when you click the sound tab...
Sound Emulation
Enables / Disables the sound in WinUAE. The 100% accurate will change the speed of the emulator to keep the sound 100% correct.
Frequency
Lets you set the frequency of the sound produced by WinUAE. 22050hz is more that adequate to emulate the Amigas sound.
Stereo Mode
The Amiga had four sound channels which were split 2 on the left and 2 on the right. To be accurate use the stereo option but if you want a more even sound use mixed.
Interpolation
This option improves the sound by smoothing out the waveform being produced. The problem that I've found is that it does slow WinUAE down quite considerably.
Sound Buffering
This slider determines the allocation of memory that will be used to produce sound. If you have choppy sound try increasing this slider.
Sound driver lag compensation
If you find that the sound in you games is out of sync the you can adjust this slider to compensate.
Floppies Tab
The Amiga being a computer used floppy disks to load its software. Unfortunately the disks aren't compatible with PC drives so to use your software in WinUAE you need to convert your disks to the ADF format. You will then need to send these images over from your Amiga to your PC using a serial cable. You can also download floppy images of your software from several sites listed above.
Here are the options on the Floppies tab...
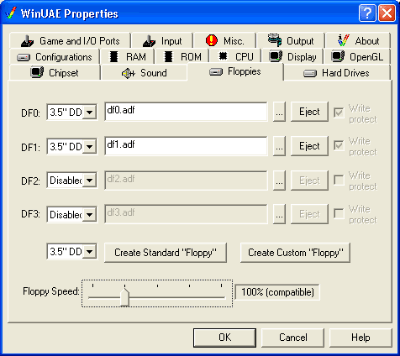
This part lets you "insert" or "eject" floppy disks from you virtual WinUAE drive. WinUAE supports up to 4 drives and all you need to do to insert a disk is to click the ... button and select a disk image.
The pulldown menu with "3.5" DD" is the type of disk drive to be emulated. At the moment you can have 3.5" DD - 880K, 3.5" HD - 1760KB and 5.25" SD - 440KB.
The disable boxes are there again for compatability because some programs dont like more than one disk drive.
The two button are to create blank disks. You can create a standard formatted disk of a custom non formatted disk depending on its use. The pulldown menu determines what type of disk is created.
Hard Drives Tab
All Amigas supported hard drives. They turned the average 2 minute loading time for Workbench into a 20 seconds.
This is what you'll see on the Hard Drives tab...
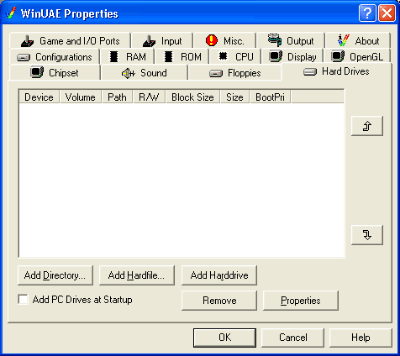
Besides floppy disks, the Amiga supported hard drives as well. WinUAE can simulate hard drives in two ways. You can either set up a directory somwhere to store the Amiga hard disk files or set up a Hardfile which is a fixed size file.
If you click the directory option all WinUAE will ask for is the directory to use.
If you click the hardfile option you will need to give the size of the drive in bytes. This can be calculated by multiplying 1024x(size in MB of the drive)x1024 e.g 1024x60x1024=62914560 bytes which creates a 60MB drive. Properties lets you change the drives settings.
The final option Add PC Drives lets you access your PC drives including CDROM) from the Amiga Workbench.
If you want to create a hard disk then you will need the Amiga workbench disks and the Amiga hard disk installer disk. You will need to find these using a search engine or buy Cloanto's Amiga Forever.
Game and I/O Ports Tab
This is the screen that you'll see when you click the Game and I/O Ports tab...
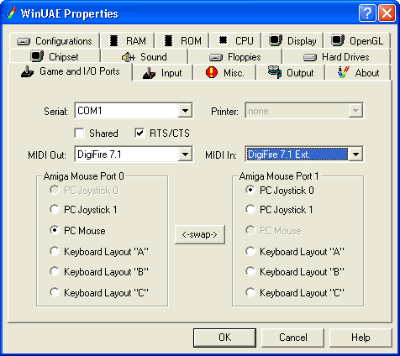
This screen is where you can set up the input and output devices attached to the Amiga.
Serial
Sets which com port WinUAE can use as its serial port
Printer
Sets which printer will be used by WinUAE.
MIDI In / Out
Sets which MIDI device is used by WinUAE when simulating a MIDI interface.
Amiga Mouse Port 0/1
On the Amiga you had two game ports. You could have either mice or joysticks attached to them. WinUAE can simulate a joystick by either using your PC joystick if you have one or by using keys to simulate the Amiga joystick. The joystick simulation uses these keys.
| Layout "A" | Layout "B" |
Layout "C" | |
| Up | Keypad 8 | Cursor Up | T |
| Down | Keypad 2 | Cursor Down | G |
| Left | Keypad 4 | Cursor Left | F |
| Right | Keypad 6 | Cursor Right | H |
| Fire | Keypad 0 | Right CTRL | Left ALT |
Input Tab
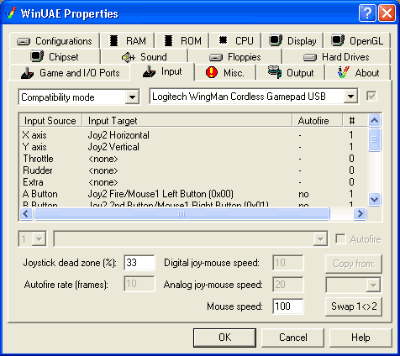
This is where you can ste up the buttons on your controller. This is the screen...
Mode
You can select one of four configuration files here.
Device
Lets you choose between joystick or keyboard support.
Joystick dead zone
Sets the percentage of movement you need to make on your analog jostick to register in WinUAE.
Digital / Analog joy-mouse speed
Sets the speed of the mouse cursor when using a joystick to control it.
Autofire rate (frames)
Sets how many frames are drawn between firing.
Misc. Tab
Here is the screen which covers miscellaneous options...
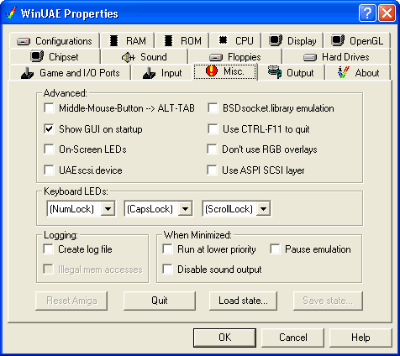
This menu covers a few miscellanous options that affect the running of WinUAE.
Advanced
Middle Mouse button / Alt Tab lets you set how to jump between controlling the Amiga mouse or the mouse on your PC.
Show GUI will automatically show the WinUAE interface when it load. If you dont select it, the default configuration will be used.
Show LED's will simulate the LED's on the Amiga computer much like the LED's on the front of a PC but using the keyboard lights.
UAE scsi.device lets UAE use your CDROM drives as amiga drives.
BSDsocket library emulation is used if you want to access the internet from WinUAE.
The CTRL-F11 option will exit WinUAE from any screen py pressing the keyboard combination.
Don't Use RGB overlays can help compatability with certain graphics cards.
Use ASPI SCSI layer lets UAE acces your CDROMS through the windows ASPI driver.
Keyboard LED's
On the Amiga there were a couple of lights that showed whether the Amiga was on and floppy/harddisk access. What you can do here is simulate them using the LED's on your keyboard.
Logging
Will create a log file for any happenings during emulation which is useful for debugging.
When minimized
Sets how WinUAE runs when the screen is minimized.
Save State / Load state
Saves and loads your games position so you can return to it later.
Reset - Resets the Amiga
Quit - Exits WinUAE
Output Tab
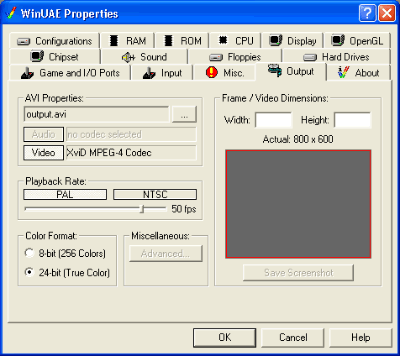
This option lets you set up WinUAE to record your session as an avi file. To do this it uses Direct Media codec to determine how the file is written. Event formats like DivX are supported. I would suggest a framerate of 25fps to be the most compatible.
Here are a few keys that you'll need to know.
| Amiga Key 1 | Left Windows Key (W95+ Keyboards) |
| Amiga Key 2 | Right Windows Key (W95+ Keyboards) |
| Help | Page Down |
| F12 | Open GUI |
| Scroll Lock | Screen Refresh (Can speed up emulation) |
| Pause | Toggle soung on or off |
| End+F1..F4 | Change disks in drives 1..4 |
| Shift+End+F1..F4 | Eject disk from drive 1..4 |
| Ctrl+F11 | Exit WinUAE (has to be enabled) |
| Alt-Tab | Get Windows mouse pointer back. |