the MP3 (and ogg vorbis) Player Project
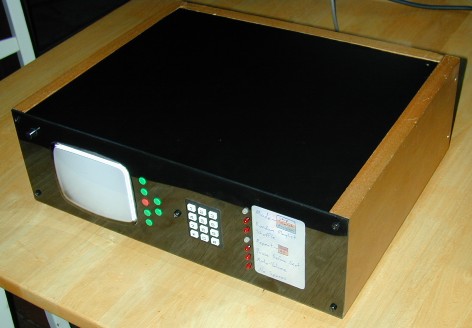
An mp3 player built from old computer parts. It plays mp3/ogg files stored on its internal hard drive. Aside from the 25 second boot you wouldn't notice there was a PC in there unless you had a look inside.
Hardware
Computer hardware:
Gigabyte Pentium motherboard
Pentium 133MHz CPU - underclocked to 75MHz to reduce the heat.
16MB of RAM
Sound Blaster Live soundcard
Hercules clone video card (for the internal monitor)
10Mb network card
80GB hard drive
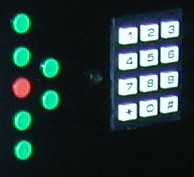  The controls. I haven't got around to marking them yet. When I do (well...I
probably won't) they will look something like the pic to the right. The controls. I haven't got around to marking them yet. When I do (well...I
probably won't) they will look something like the pic to the right. |
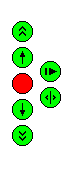
 More controls... these ones light up
when pressed. 'Mode' changes the operations of the buttons above (for programming
playlists). 'Random Playlist' grabs 1000 random songs from the hard drive and puts them
into a playlist in random order. The rest are just standard mpxplay functions. More controls... these ones light up
when pressed. 'Mode' changes the operations of the buttons above (for programming
playlists). 'Random Playlist' grabs 1000 random songs from the hard drive and puts them
into a playlist in random order. The rest are just standard mpxplay functions.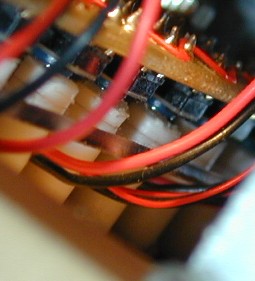 The pic on the left shows how
they work. They're just LEDs mounted onto a short bit of plastic tube (StripStyrene). When
pressed they make contact with the tactile switches behind them. The pic on the left shows how
they work. They're just LEDs mounted onto a short bit of plastic tube (StripStyrene). When
pressed they make contact with the tactile switches behind them. |
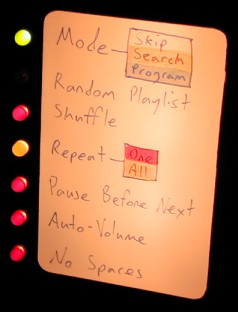
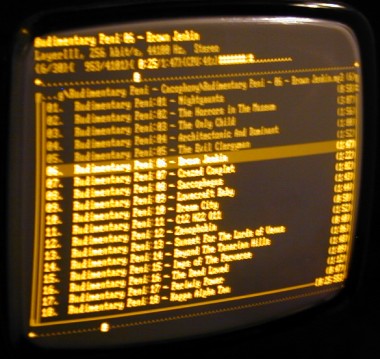 A screenshot. The image is really very sharp. It looks a bit
blurry in the pic but that's just my poor photographic skills. A screenshot. The image is really very sharp. It looks a bit
blurry in the pic but that's just my poor photographic skills. |
|
 Here's what all those little
circuit boards mounted near the front do. Going clockwise...Dual keyboard board - Stephan Hans' design - I
can use the front panel controls and an external keyboard at the same time. The next board
just supports the switches for the front panel. Next is the parallel port interface board.
It uses a 74LS244 to drive the lights and the relay circuit. To the right of that is the
keyboard encoder board. It uses a PIC16F628 microcontroller. Based on this design by Tony
Kubek. Then finally, on the other side of the monitor is the relay board. The relay is
wired in parallel with the power switch. When the power switch is turned off it signals
the software to save it's settings. After that's done the software signals the relay (via
the parallel port) to shutdown the computer. This all happens very fast so it feels like
the switch controls the power-off directly. Here's what all those little
circuit boards mounted near the front do. Going clockwise...Dual keyboard board - Stephan Hans' design - I
can use the front panel controls and an external keyboard at the same time. The next board
just supports the switches for the front panel. Next is the parallel port interface board.
It uses a 74LS244 to drive the lights and the relay circuit. To the right of that is the
keyboard encoder board. It uses a PIC16F628 microcontroller. Based on this design by Tony
Kubek. Then finally, on the other side of the monitor is the relay board. The relay is
wired in parallel with the power switch. When the power switch is turned off it signals
the software to save it's settings. After that's done the software signals the relay (via
the parallel port) to shutdown the computer. This all happens very fast so it feels like
the switch controls the power-off directly. |
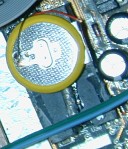 The motherboard had a real-time clock
chip on it, the type with the cmos battery and timing crystal encased in epoxy on the top.
The problem is that the batteries in these chips are only guaranteed to last for 10 years.
The motherboard is 8 years old already so it was about time for a battery change. More
info on this can be found on this RTC
Modification page. The motherboard had a real-time clock
chip on it, the type with the cmos battery and timing crystal encased in epoxy on the top.
The problem is that the batteries in these chips are only guaranteed to last for 10 years.
The motherboard is 8 years old already so it was about time for a battery change. More
info on this can be found on this RTC
Modification page. |
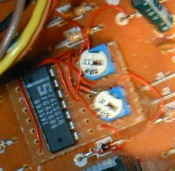 The monitor was bought from Timeline Inc (I bought a few of them :). It's a TTL
monochrome monitor with an amber phosphor, running at ~18khz horizontal scan frequency.
I've connected it to an old 8-bit ISA Hercules clone video card. One small problem I had
with the monitor was that it only supported two intensity levels, normal and high. I
needed a low intensity for the cursor so I modified the board (pic right). The two
trimpots control the contrast of the normal and low intensities. The monitor was bought from Timeline Inc (I bought a few of them :). It's a TTL
monochrome monitor with an amber phosphor, running at ~18khz horizontal scan frequency.
I've connected it to an old 8-bit ISA Hercules clone video card. One small problem I had
with the monitor was that it only supported two intensity levels, normal and high. I
needed a low intensity for the cursor so I modified the board (pic right). The two
trimpots control the contrast of the normal and low intensities. |
Software
The operating system is selectable by a switch on the back, either ms-dos 7.1 or windows. The only reason to load windows is for the network support (no dos network clients support long file names) but this comes at the price of start up time, which goes up to 50 seconds. I usually keep the switch in the dos position unless need to transfer files to it over the network.
I use a modified version of Mpxplay as the frontend. Modifications include control for the lights, the addition of a screen saver and changes to the display code to make it look nice on a monochrome monitor.
The hard drive is 40GB in size, which is bigger than the bios on the motherboard will allow. To overcome this problem I've installed bios overlay software (ontrack). Unfortunately this means if I put the hard drive in another computer I won't be able to read the data on it (unless I boot from it).
Update 17/4/05
It's been running well for the past 4 months. One small problem I had...about a
month ago it suddenly stopped booting. I found the problem was that I was using metal
washers to hold the motherboard in place. It didn't look like they were shorting anything
but after replacing them with nylon washers the problem went away.
I've deleted Windows (it was too buggy) and now rely on the ftp server built into Mpxplay for file uploads/maintenance. Operating system is 100% DOS.
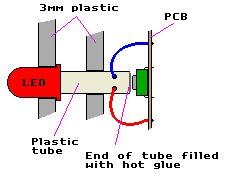 To the left is a diagram detailing the construction of the illuminated
pushbuttons. To build one cut the LED's legs short and solder wire to them, cut a plastic
tube to desired length and glue to the base of the LED (wires come out of holes drilled in
the side, not the bottom), and then fill bottom of the tube with hot glue and mount as
shown. To the left is a diagram detailing the construction of the illuminated
pushbuttons. To build one cut the LED's legs short and solder wire to them, cut a plastic
tube to desired length and glue to the base of the LED (wires come out of holes drilled in
the side, not the bottom), and then fill bottom of the tube with hot glue and mount as
shown. |
Update 4/12/05
Flawless operation since the last update, and I've made a couple of
modifications. The first is on the software side of things...I came across wims.rainbow-software.org and downloaded a
patched version of the award bios for my motherboard. It can now see big hard drives
without the need for overlay software. I've also removed the VGA card (it was left over
from the original setup), played around with a few things and now the startup time is only
15 seconds!
Modification number two was to make the thing quieter. The thing sounded like a computer! The idea I had was to mount all the hot bits of the power supply on a big external heatsink and piss off the fan altogether. It didn't work quite like that but I came to an acceptable compromise....
I bought a big heatsink that was rated at 0.5 deg c/watt (too big, it never gets much more than 'noticably warm'), chosen simply because it was the biggest heatsink that I could mound on the back pannel. Then screwed all the active devices in the power supply (two chopper transistors and a pair of diode packs) and connected them to the PCB via ~200mm long wires. After testing it like this without any fan running I noticed that the big filter choke on the secondry was getting extremely hot. Normaly I wouldn't care, it's a damn coil - it can get as hot at it likes so long as it doesn't set fire to surrounding things, but the electro filter caps sit right next to it and they don't live very long if you make a habbit of heating them up all the time. So what I did was mount a heatsink to this coil thing (attached with cable ties and a liberal ammount of thermal paste) and repositioned it a little bit so it's not so close to the electro caps. At least I can touch it now.
I ran it like that and with the fan disconnected for a while but soon found that it needs some airflow through it. Without any air movement it gets very hot in there. The CPU, monitor's horiz section, motherboard's voltage regulator, hard drive, etc all contribute to heat generation and make the mp3 player into a a good size pie warmer. So, in order to prevent a disaster (like bits of meat pie shorting out internal circuitry), I hooked the fan back up; this time to just 5 volts instead of the usual 12. It keeps enough air moving around to keep all the inards cool (not as cool as they were previously, but cool enough) and makes hardly any noise.
--
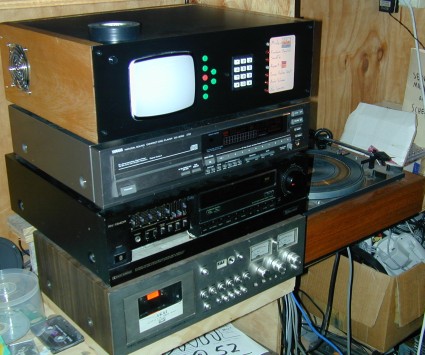
here it sits with the rest of the gear
![]()
Last updated 4/12/05
Created 16/11/04
