
The following will detail the
conversion/restoration of this cabinet.
BACK
 |
Whoo! Got 2 of these
monster cabinets. Nothing better than a Dynamo cabinet for
mame...no classic cabinet sacrificing, and the panels are
pre-drilled for 2 trackballs, or three joysticks, with buttons
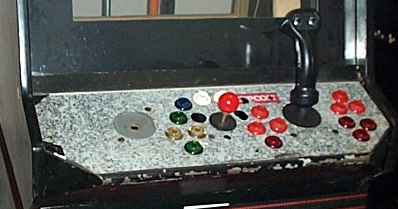
for all! Here I've already started to convert it with a
gorf-style stick and a mass of buttons. |

PERCENT COMPLETE |
| |
|
 |
|
|
|
|
This is actually just a trial
run. The buttons drilled in this thing are all crazy, so it
looks like I'm going to have to drill a bit more to get
something useable. In the trackball hole on the left, I'm
going to mount an oscar spinner, with a couple of buttons
dedicated to it. The center joystick is of course a wico
leaf-switch red knob, and the joystick to the right is a new
Happ trigger stick. I'd like to end up with 6 buttons per
player here, but of course some will be duplicated by the three
buttons on the triggerstick.
|
|
|
|
|
|
|
|
| |
|
|
| |
|
|
| |
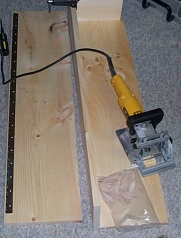 |
The new owner of this cab
wanted a 4 player panel (just like the Dyno cab) so here is a
shot of the beginning work. I joined the pine boards
together with my biscuit joiner. For those not familiar
with the joiner, it allows little compressed wooden biscuits to
slip into grooves you cut in pieces you want to join.
When glue hits the biscuit, it starts to expand, filling the
gap, and making a very strong bond. A follow up with the
nailer, and a bit of time in the clamps, and the panel is ready
for mounting. |
|
| |
Here I test the fit. It
fits like a glove! Since the panel will be too wide to fit
through a door, I have to make it removable. I have filled
all the holes with filler, sanded the corners, and cut the top
plexi. The graphics are headed to the printers, and the
parts are coming. Primer, paint and diamond acrylic finish
will make this a strong, attractive panel. Tomorrow to cut
the groove for the t-molding. |

|
|
|
 |
Here the panel starts to come
together. The laminate print is down, and the plexi is
cut, now just to start drilling and routing the wood.
Picked up a couple of systems for these twin cabs, with gigapro
chips, video and sound built right in, perfect for mame!! |
|
Got a nice replacement for
that horrible orange marquee I've been using in this cab.
It's one I did up and available in the
marquee section, and it turned out awesome!! |
 |
| |
 Two
panels are done, still just awaiting the joysticks and spinners.
I wired the computer speakers to a volume control, and wired all
the buttons to the I-pac. I'm trying a spinner/trackball
USB hack I picked up from the Oscar controls site. As soon
as I have that working I'll post a pic. Here the panel is
shown flipped forward open. The flip top panel clamps
down, then the entire panel assembly is mounted to the cabinet
with carriage bolts. Two
panels are done, still just awaiting the joysticks and spinners.
I wired the computer speakers to a volume control, and wired all
the buttons to the I-pac. I'm trying a spinner/trackball
USB hack I picked up from the Oscar controls site. As soon
as I have that working I'll post a pic. Here the panel is
shown flipped forward open. The flip top panel clamps
down, then the entire panel assembly is mounted to the cabinet
with carriage bolts. |
|
| |
 If you can believe it, I had a lot of difficulty getting the 20"
monitors to fit into the cabinets. Changing the viewing
angle a bit let them fit in, but JUST!
 |
|
| |

Over 250' of wiring went into
this cab. I started with a 1000' roll of 22ga braided
wire, and after two identical cabs, I'm down to half a roll.
I should count the quick connects too, but I think I'll just
leave the estimate at LOTS. Here you can see the underside of
one of the flip up panels. I've placed a piece of plexi
over the I-pac to keep most debris and moisture off the card,
and covered the trackball interface as well. |
|
| |
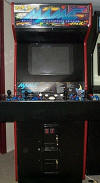 Got
the cabinet finished (finally). Just like the Dyno cab, it
features a Mame/jukebox ready system, ready for roms and mp3's,
and set for possible future upgrades. Got
the cabinet finished (finally). Just like the Dyno cab, it
features a Mame/jukebox ready system, ready for roms and mp3's,
and set for possible future upgrades.  |
|
| |
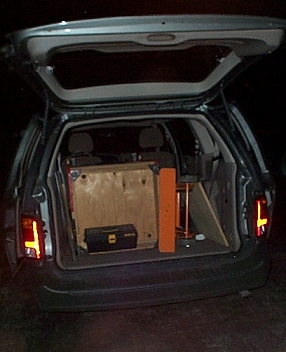
There she goes for a
wonderful night time delivery. The good thing about the
sensible family minivan, is that you can rip out all the seats,
and stuff a cabinet in it. When you get to where you are
going, the cabinet is warm, and bug free. To anyone who
has moved a cabinet in summer in the back of a pickup, you know
what I'm talking about with the bugs!! |
|
|