|
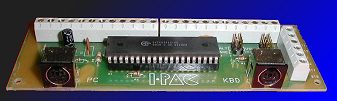
REVIEW: Ultimarc I-PAC |

First Impression: From the very first day I removed my homemade keyboard hack and wired up the I-pac I was hooked. In fact, it ran perfectly from the first installation. Since the I-pac defaults to a mame setup, you are ready to go right out of the package. Connect the wires properly, and you are playing your favorite game in no time!
Ease of Use:
After getting your controls mounted into your custom panel, or using the
existing wire harness and following the leads, you will want to connect the
I-pac as follows: Take your ground wires (common wires on your microswitch
or one of the two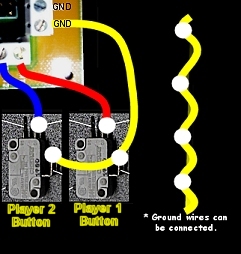 connections
on a leafswitch), and daisy chain them together as in the illustration to
the right. The I-pac has two grounds, so it might be an idea to share the
ground wires on all of the player one controls, and share all the wires into
player 2 controls. This way if you have a problem, it’s a little easier to
diagnose. Connect these resulting two ground leads into the two GND
connections on the I-pac. For each of your controls you will now need a
single wire. In the example, you can see the two microswitches that would be
used for the player one and player two pushbuttons on your control panel.
The blue wire would be soldered or quick-connected to the closer of the two
prongs on the microswitch (marked NO), or the second connection on your
leafswitch. Connect this wire to “Start 2” on the I-pac. Repeat the process
with the red wire from the Player 1 start button (note: your wires will be
whatever colors you chose them to be!) Repeat this entire process for the
rest of your buttons and joysticks. Each I-pac has inputs for
connections
on a leafswitch), and daisy chain them together as in the illustration to
the right. The I-pac has two grounds, so it might be an idea to share the
ground wires on all of the player one controls, and share all the wires into
player 2 controls. This way if you have a problem, it’s a little easier to
diagnose. Connect these resulting two ground leads into the two GND
connections on the I-pac. For each of your controls you will now need a
single wire. In the example, you can see the two microswitches that would be
used for the player one and player two pushbuttons on your control panel.
The blue wire would be soldered or quick-connected to the closer of the two
prongs on the microswitch (marked NO), or the second connection on your
leafswitch. Connect this wire to “Start 2” on the I-pac. Repeat the process
with the red wire from the Player 1 start button (note: your wires will be
whatever colors you chose them to be!) Repeat this entire process for the
rest of your buttons and joysticks. Each I-pac has inputs for
 one joystick with 8
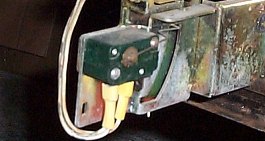
buttons each, plus 2 player start buttons and 2 coin switches. The coin
switches can be wired to a button installed on your panel, or on the
switches on the coin mechanisms on your cabinet, which operate just like a
microswitch pushbutton. Check the switch markings for which one is common,
and which one is NO (normally open). Once your connections are complete, you
can test your work by hooking it up to your computer. If you ordered the ps/2
connection, the I-pac should be set to go, if you ordered the USB version,
then you will have to move the jumper up so that it covers the two pins
beside the USB print. If your connections are correct, and the jumper is
set, then you just need to plug a PS/2 style keyboard into the socket
labeled KBD on the Ipac, connect the included cable to your PS/2port (or
adapter if you have the old style keyboard plug), or an available USB port.
Restart your computer and use a mouse to open notepad (assuming you are
running windows, otherwise just do the following at the dos prompt). Push
all the buttons of the keyboard (the joystick one control just simulates
arrow keys, so it might not seem to be
one joystick with 8
buttons each, plus 2 player start buttons and 2 coin switches. The coin
switches can be wired to a button installed on your panel, or on the
switches on the coin mechanisms on your cabinet, which operate just like a
microswitch pushbutton. Check the switch markings for which one is common,
and which one is NO (normally open). Once your connections are complete, you
can test your work by hooking it up to your computer. If you ordered the ps/2
connection, the I-pac should be set to go, if you ordered the USB version,
then you will have to move the jumper up so that it covers the two pins
beside the USB print. If your connections are correct, and the jumper is
set, then you just need to plug a PS/2 style keyboard into the socket
labeled KBD on the Ipac, connect the included cable to your PS/2port (or
adapter if you have the old style keyboard plug), or an available USB port.
Restart your computer and use a mouse to open notepad (assuming you are
running windows, otherwise just do the following at the dos prompt). Push
all the buttons of the keyboard (the joystick one control just simulates
arrow keys, so it might not seem to be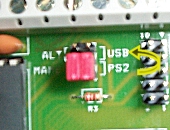 working if you test with just that). The player one and two start buttons
should print “1” and “2” to the screen if your connections are correct.
Check all your buttons and if they are not operating, shut down the system
and re-check your wiring. If there are just a few fluky things going on,
press CTRL-ALT-P at the same time, and you should be brought to a test
screen (or the programming screen if the second jumper is set to ALT. The
test screen should help you find where your troubles lay. Restart your
computer and load up your favorite game, time for a test drive!!!
working if you test with just that). The player one and two start buttons
should print “1” and “2” to the screen if your connections are correct.
Check all your buttons and if they are not operating, shut down the system
and re-check your wiring. If there are just a few fluky things going on,
press CTRL-ALT-P at the same time, and you should be brought to a test
screen (or the programming screen if the second jumper is set to ALT. The
test screen should help you find where your troubles lay. Restart your
computer and load up your favorite game, time for a test drive!!!
Customer Service:
If you e-mail Andy with a question, he is awesome at getting back to you. I
have yet to read ONE negative posting about the customer service. He’s
helped me out a couple of times, and
Overall: I’m going to rate the I-pac with top honors, the lack of documentation being the only thing keeping this from getting an A+. since it honestly is a fantastic product. I’ve installed 8 of them so far (and counting), and have not had a problem with any of them. They function perfectly, and are priced well below the competition. Of all the things I install into a cabinet, this is the one I worry least about.
RATING ![]() (OUT OF 5)
(OUT OF 5)
Once Zakk explained to me what this thing does, I could see why everyone goes on about it! It's similar in design to the one built into my X-arcade unit, although I have never read postings about keypress problems, like I have with the X-arcade one. It's not pretty, it's not extravagant, it just does the job, and that, for me, is great. When I finally get the room for my own super cab, I would have no reservations about putting this unit into it. For the price, you can't beat it!
RATING  (OUT OF 5)