
Please note: I cannot be held responsible for any damage or injury that may result from attempting the procedures on this page. You do so at your own risk! SWITCHING POWER SUPPLIES ARE NOT TOYS AND EXTREMELY DANGEROUS!
Simple things that make the cabinet more professional looking and operating. This procedure utilizes the original transformer and parts that came with the arcade cabinet (but can be easily obtained). Tools needed:
Soldering iron, Wire strippers,Wire, Electrician’s Tape or shrink tubing
Here’s what we’re out to accomplish today:
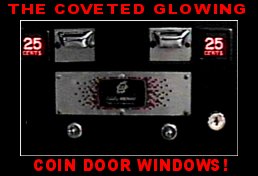
Granted, its not really all that exciting, but for such a simple procedure, it sure pays off in effect! We’ll also be installing a cabinet fan, to cool the interior, and wiring a main switch to the power bar. Let’s look first at the original arcade switching power supply. This will give us power to our fan and lights. Be sure to do all connections with the unit off! These things are lethal. Under no circumstances should you open this unit! If it appears to be faulty, discard it immediately!
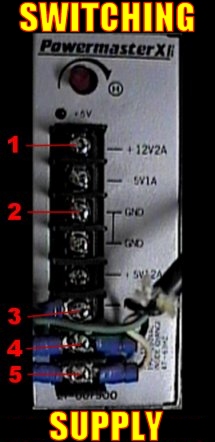
1 - +12V2A
2 - GROUND
3 - F GROUND
4 - AC BLACK
5 - AC WHITE
The main grounded AC line (power cord) will connect to 3 4 and 5. Green wire, black wire then white, respectively.
The 3-prong plug is then inserted into our power bar, which is already powering the florescent light, monitor and computer. Now for a fan, we’re using a standard arcade cabinet fan, which is more powerful than a computer case fan, as it runs on 12VAC. These can be found in an electronics shop, radio shack, or old video game cabinets. The two fan leads are connected to ‘quick-disconnect’ end pieces (the blue ends on the wires). Now secure these wires to 4 and 5.
That should be all the wiring required for the fan. Install the fan with the flow facing inwards. Most cabinets have heat vents in the top of the cabinet, but if yours doesn’t have them, this
would be a good time to drill some small holes, or purchase a grille, and cut a larger hole. Air coming into the cabinet has to get out somewhere!
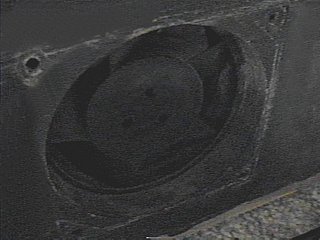
Fan on back of cabinet, grille removed.
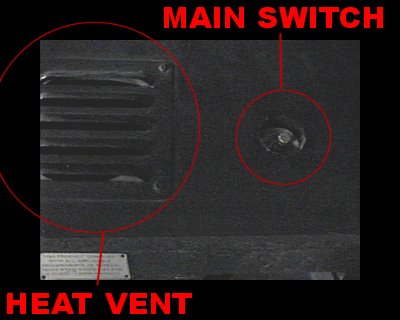
Here is the top of the cabinet. There is a large heat vent, and the ‘hidden’ main power switch. This switch would have once been inline with the main power supply, and now should do the same thing, only with our power bar. Now this is a bit tricky, and should be done with care, since it could cause a short or a fire if improperly done. Remove the lower cover on the power bar, and locate the wires running from the AC line in to the main power switch. There should be a green wire, a black wire and a white wire. This is of course a generalization, but you should get the idea. We want to cut one of these wires to interrupt the circuit. Once cut, solder two leads (wires) from your new switch to these two newly formed leads. Below is a rough idea of what we’re doing here.
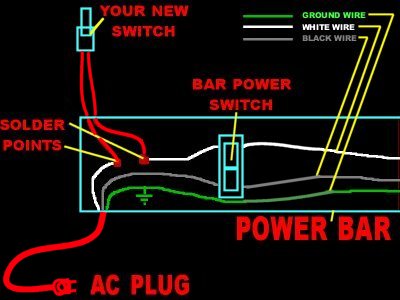
Okay, not a very technical diagram, but you should get the idea. Now, even if the power bar is plugged in, and turned on, anything plugged into it will not come on until you press the new switch, which is conveniently located pretty much anywhere you want to install the thing.
Back to our coin lights! We need to get power from the supply to the lights.
The lights themselves are 12 volt automotive lights which you can pick up for free at the auto wreckers, if you have pockets ;)
We need to chain the lights to +12V2A (1) and ground(2) on our supply. You may need a
length of wire here, to get from the coin door to the supply. Other than that, its pretty straightforward. Solder the wires to the bulb-holders, and the use quick disconnects on the supply end.
DONE! It should look something like this:
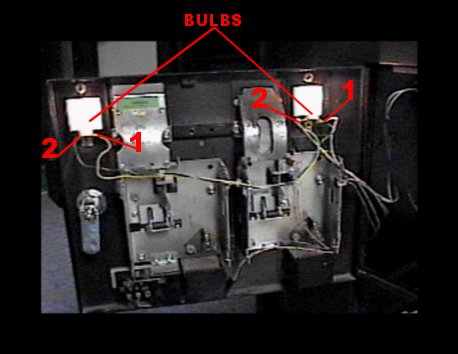
That’s it! Now when you plug everything in, and press that new button, the unit powers up, complete with fan, main power and coin window lights! This may have been a bit vague in places, so e-mail if you have any questions!
UPDATE! I have tried hooking the bulb sockets to the 12V supply line of the computer, and it worked perfectly. For more information, look here.
(c)2002 Massmame Inc. All rights Reserved. No duplication without permission.