How to Replace the Stock Subwoofer
with a Aftermarket Subwoofer
1990-1994 Lexus LS400
Due to the location of the subwoofer in our cars the sun causes it to wear out over time. In some cases it will completely disintegrate the sub (like mine). Lexus dealers will charge some outrageous price to buy and install a new sub. Now, if your sub isn’t working and you want to replace it, you have two choices. One, you can either buy an aftermarket one, or two, buy one from Lexus (Lexls.com note: Nakamichi sub ~$312, Pioneer sub ~$192 at the dealer). If you buy one from Lexus, it’s a simple take out and replace job, if you want to put in an aftermarket one, then the job won’t be so simple.
Stock setup of subwoofer
8" 2 Ohm sub, 40 watts RMS
You should look for a sub that works below and above that wattage power, if you find a sub that is too powerful and does not have an RMS
around or ideally BELOW 40 watts, then you could end up damaging your sub by under powering it. It would be best to tell the store that
your sub output is 40 watts and he should help you out.
The sub I bought was from Crutchfield and it was the Kicker Comp 03C84 and it cost me $70.
Tools for aftermarket sub
NOTE: if you chose this you will have to destroy your old sub!
- 10mm socket wrench
- Screwdriver
- Wrench
- Drill with metal bits
- Dremel tool with cutoff bit, or metal saw
- Nuts, bolts and washers (look at your new sub and the mounting holes around it, you want your bolts to nicely fit through those mounting holes.)
- Soldering iron with solder
- Vice
- Threadlocker
- 10mm socket wrench
- Screwdriver
- Soldering iron with solder, (If Lexus gives you the sub without the connector, then you will need them from your old sub)
1) Remove the subwoofer cover.

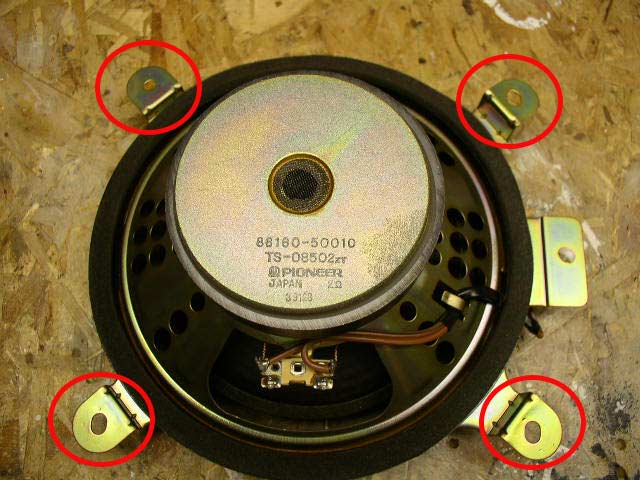
2) Now you want to get that 10mm socket wrench out and undo the 4 bolts holding down your sub. After this, unplug your sub and take it out. Highlights are where the 4 bolts are.
3) If you are just replacing your sub with a Lexus one then plug in the new one, bolt it down, put everything back together, and you done. If your sub didn’t come with a plug, then take the one off the old sub, and solder it to your new one.
For those of you who want the quality of an aftermarket one, then you will now have to take the old sub and rip everything off of it, by this I mean take off the plastic parts that connect to the sub’s metal parts. There are some screws to this, and some very strong glue. Once you have taken it off and your sub only has one metal piece that it is connected to, then you are ready to pull out that dermal and vice. Now what you want to do is get that metal ring that is around the sub with the mounting ears in once piece so you can use it to mount your new sub. Finally, cut the metal around the sub. The easiest way to do this is to put one ear or bracket of the sub into a vice, and start hacking or dremeling away!

4) Insert your new sub into this homemade bracket. Your new sub should be round with holes around it for mounting. Use a marker to mark where you have to drill holes in your bracket so you can bolt the sub to the bracket. NOTE: USE THREADLOCK OR YOUR BOLTS COULD COME LOOSE. To use threadlock you put it on the bolt so the nut will go through it, it’s kind of special glue so your nut won’t come off from vibrations.
5) Once you have drilled holes and bolted your sub to the bracket WITH THREADLOCK, then you are ready to take the connecter from your old sub and solder it to the new one. The wire with a black line through it is the negative one.

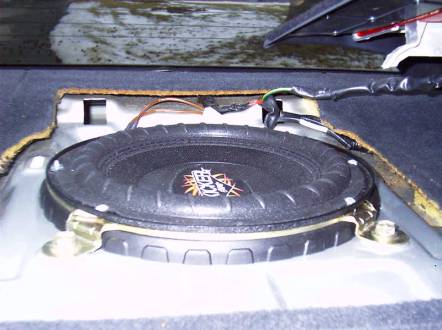
6) Your subwoofer should have come with a rubber ring/gasket, you will take this and place it between your sub and the car mounting hole (see picture). Take your sub and use the 4 10mm bolts that held down the old sub to mount the new sub/old sub to the rear deck. If you don’t have a ring like the one above your sub won’t be half as effective, you need a good seal there.
7) Now you are all ready to turn on your stereo to see if your sub works. If everything works properly, then connect your 3rd brake light and snap the cover back on. NOTE: you might want to check to see if you plugged your 3 rd brake light back in and it is working.
8) ENJOY!!
Conclusion
If you are just replacing the sub I found it to be a simple and money saving job. If you are putting in an aftermarket sub you won’t
be able to tell a big difference without a new amp, but it gets the job done without a new one.
Lexls.com Notes: If you just want to restore the bass in your stock system this is a good route to take; it's inexpensive and it works. There are other methods for installing an aftermarket subwoofer but they usually require much more time and money. The other inexpensive route is to create a wood baffle and bolt it down to the deck. Then screw the sub into the baffle you created. Using this baffle method you may be able to fit a 10" woofer in the rear deck hole (it may require modification of the sub cover though). There are other methods for fitting an aftermarket sub in the LS, but most require much more time and money. I am a big music guy so I had to go all aftermarket. My sub and amp are mounted underneath the rear deck, see pics. Thanks for contributing the article Nick!
If you found this information useful please support the site by clicking the button below and making a donation. Thank you.
