How to Replace the Spark Plugs & Ignition Wires
1990-1994 Lexus LS400
Installing new plugs and wires doesn't take that long but it does take a little while to get to them. Take your time when you're installing the plugs and wires so you get everything right the first time, double check all your work, then check it again. Also cleaning takes a long time and chances are your engine will be quite dirty.
Tools Needed:
- Screwdrivers
- Socket wrenches, sockets, extensions
- Angled socket joints
- Pliers
- 16mm spark plug socket
- Torque wrench
Parts/Supplies Needed:
- 8 spark plugs, platinum or iridium
- Tune-up kit > dielectric grease & anti-seize
- Ignition wire set (use tool to check product fit)

1) Buy the parts. I decided to go with Vitek spark plug wires because they were not too much more than the Lexus wires. I went with NGK Iridium IX spark plugs because they are supposed to have a long life. The Tune-Up Kit can be purchased from a local auto store. It contains anti-seize lubricant and dielectric grease.

2) Apply the anti-seize lubricant to the spark plug threads. This is something you should definitely use because it will help with the install and prevent future problems. These plugs come pre-gapped. I did this step ahead of time so the plugs were ready to go in quickly.

Optional: Test the resistance of the new wires. The repair manual indicates that the maximum resistance of a wire is 25k Ohms. My Vitek wires were 0.89-3.76k Ohms, that's very low!

3) Remove the negative (-) lead on your battery and wrap it with a cloth. This is a safety issue.

4) Unscrew and remove this cover.

5) Remove this 10mm bolt to remove the main air intake.

6) Remove the 10mm bolt, unclip, and remove the air filter holder.

7) Unclip and remove the relay cover for extra space. Unclip air flow meter connector and remove the two 10mm bolts.

8) Make a mark on this clamp so you know how much to tighten it when you put it back on (in this pic I have already loosened the clamp). Remove the air flow meter assembly.

9) Remove these 3 10mm bolts and then remove the throttle body cover. TRAC models may be slightly different.

10) Unclamp and disconnect the two hoses that connect to the air intake pipe. Remove the two 10mm bolts at the edges. Mark the clamp position and loosen, then remove the air intake connector pipe.

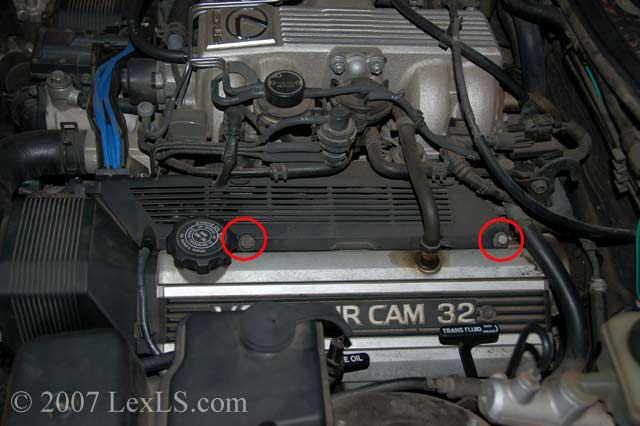
11) Remove these 10mm bolts to remove the upper ignition cable cover.

12) Remove this 10mm bolt to remove the RH engine wire cover.

13) Remove these 4 10mm bolts to remove the RH timing belt cover.

14) Remove these two 10mm bolts to remove the LH engine wire cover. Take off the oil cap to get the piece out then replace the cap.

15) Remove the 4 10mm bolts and disconnect the vacuum hose that goes over the LH timing belt cover, remove the cover. The bolt locations are the same as in step 13. However, you will need a angled socket joint to get these bolts off as you can see in this pic.

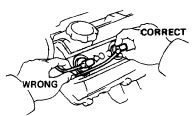
16) Now that all the covers have been removed you can finally get at the wires. Unplug & remove the old wires and the 5 10mm bolts that hold the wires on the engine. This will probably not be as easy as it looks. My wires were the original ones from 1991 so they were on there very tight! The repair manual says not to pull on the wires because doing so can damage them. I did do this on many of the wires because they were so stuck on there. One wire broke and I'm sure many others were damaged. Maybe using a pliers while doing the "correct" method would have been better.


17) Depending on how you did the last step your wires may or may not look like this. Either way remove the wires from their holders, you'll need the holders if you're using Vikek wires.

18) Before removing the spark plugs now is the time to clean up the engine. I used lots of rags and engine degreaser. Here's a before pic of the RH side. As you can see, even with all the covers on the 1UZ-FE it still gets dirty. Also make sure there is nothing in the chambers except the spark plugs at the bottom of them, they should be clean as well.

19) Remove all 8 spark plugs using a 16mm spark plug socket with an extension.

New vs. old. I can't tell for sure but I think these may be the original spark plugs. My LS was so neglected before I bought it! The old plug was a Denso (ND) PK20R11.

20) Place the new spark plug (with anti-seize compound, step 2) in the socket and carefully lower it into the chamber. Tighten the spark plug by hand and be careful that it is properly threaded. Otherwise you'll damage your engine.

21) Using a torque wrench, torque each plug to 13 ft-lbs (180 kg-cm, 18 N m).
22) Clean the wire holders and install using the 5 10mm bolts.

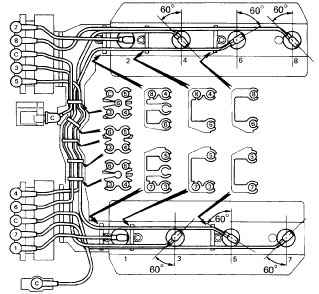
23) This diagram shows you exactly how the wires need to be connected. If you are using Vitek wires don't worry about the wire holders in the center, they are not needed. Since the Vitek wires are bigger you may need to slightly modify the holders.

24) Start installing the new wires; make sure to apply some dielectric grease to each side of the wires before you plug them in. I started with wire #8 and worked my way down to #1.

Optional: I clipped off a few of the holders to make room for the larger wires.

25) Important! Double check your work, then triple check it. Be sure everything is well connected and each wire goes to the correct location on the distributors.

26) Put back all the covers in reverse order of removal. Reconnect your battery and go for a road test. Once the car has warmed up inspect idle speed. Normal idle speed is 650 RPMs, + or - 50 RPMs. After replacing the spark plugs and wires my idle was 650 RPMs, dead on.
| My old wires (k Ohms) | New stock wires should be about (k Ohms) | Vitek wires (k Ohms) |
1=NR (no reading) |
1=4.78 |
1=1.05 2=1.86 3=3.38 4=3.44 5=3.16 6=3.76 7=2.13 8=2.25 C=0.89 (RH side) C=1.12 (LH side) |
It's amazing how low the Vitek wire resistances are! Remember that the repair manual states that the maximum resistance is 25 k Ohms. Two of my wires were above this and I couldn't even get readings on most of them. I probably broke them during the removal, they were pretty weak.
If you found this information useful please support the site by clicking the button below and making a donation. Thank you.
