INTRODUCTION AND SCREENSHOTS
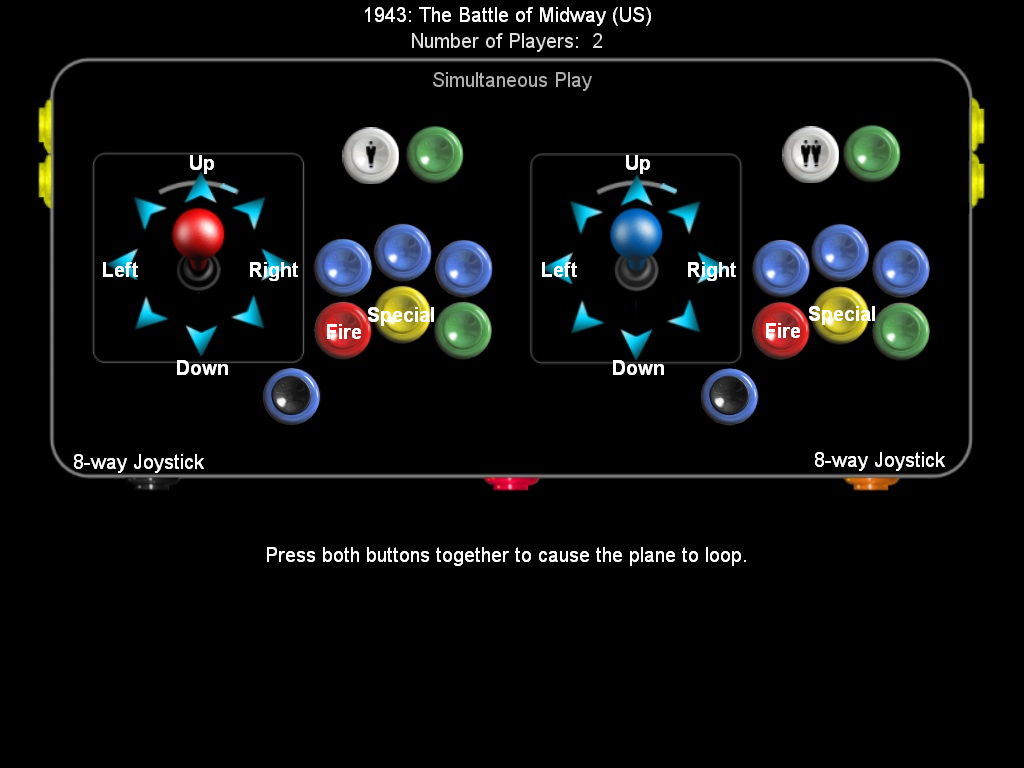
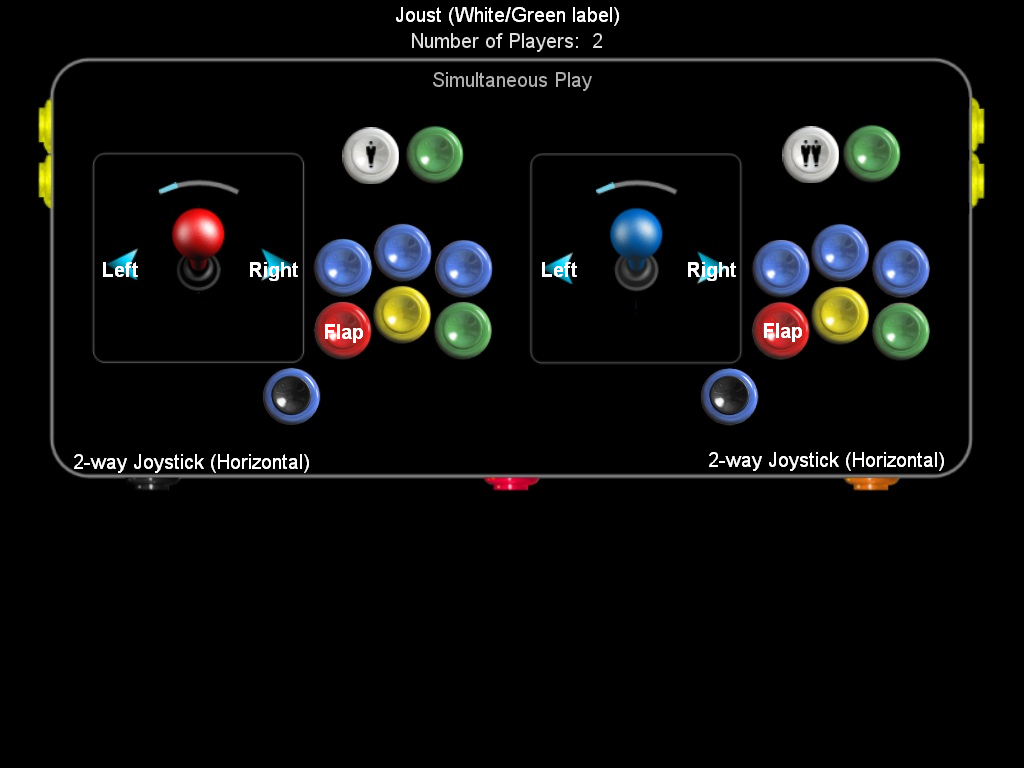
Again, here are screenshots Howard Casto's Johnny5 program with my background images showing 1943 and Joust (click to enlarge and click again to expand, they will look MUCH better):
For my requirements, one of the main things I was looking for was the ability to display whether the Prodigy™ joysticks should be in 4-way or 8-way mode, and Johnny5 accomplishes that (see blue tick marks on images above)
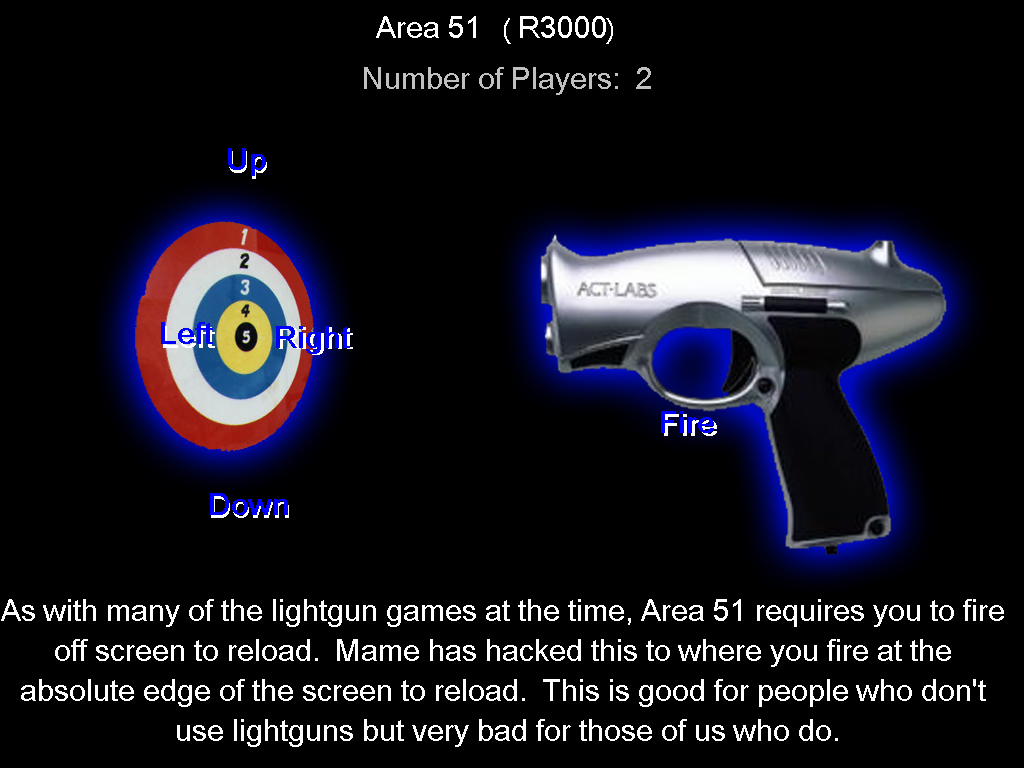
And here are the default images you will see when you first run Johnny5, this time showing 1942, Area 51, and City Love (again, click twice for full glory):
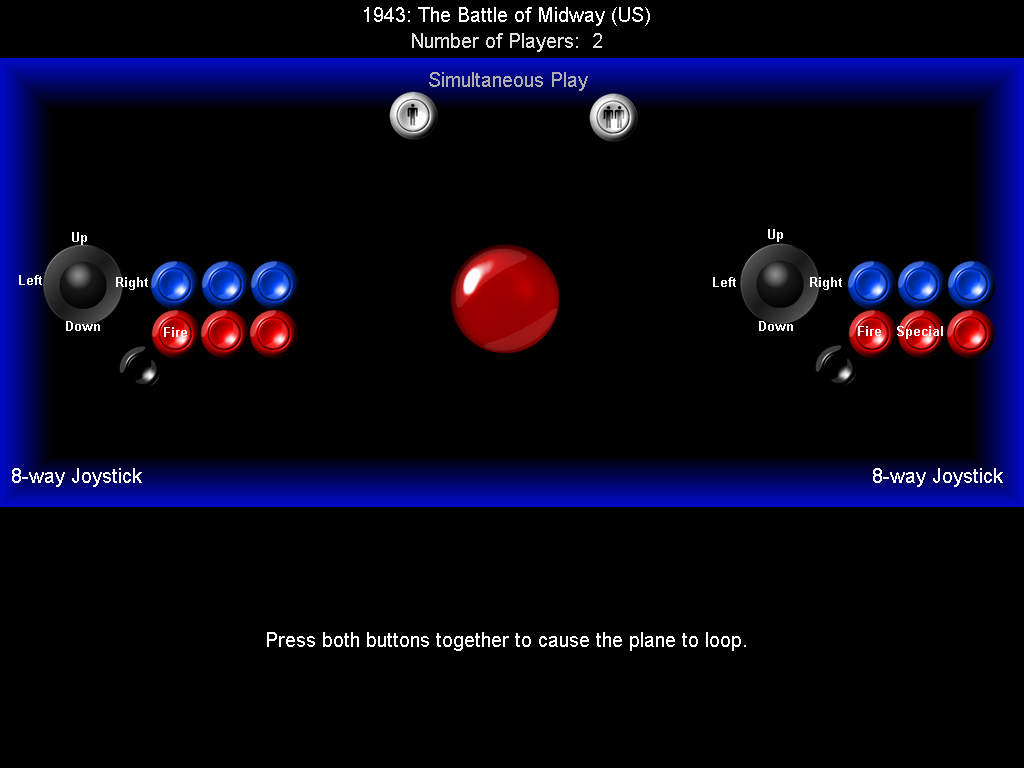
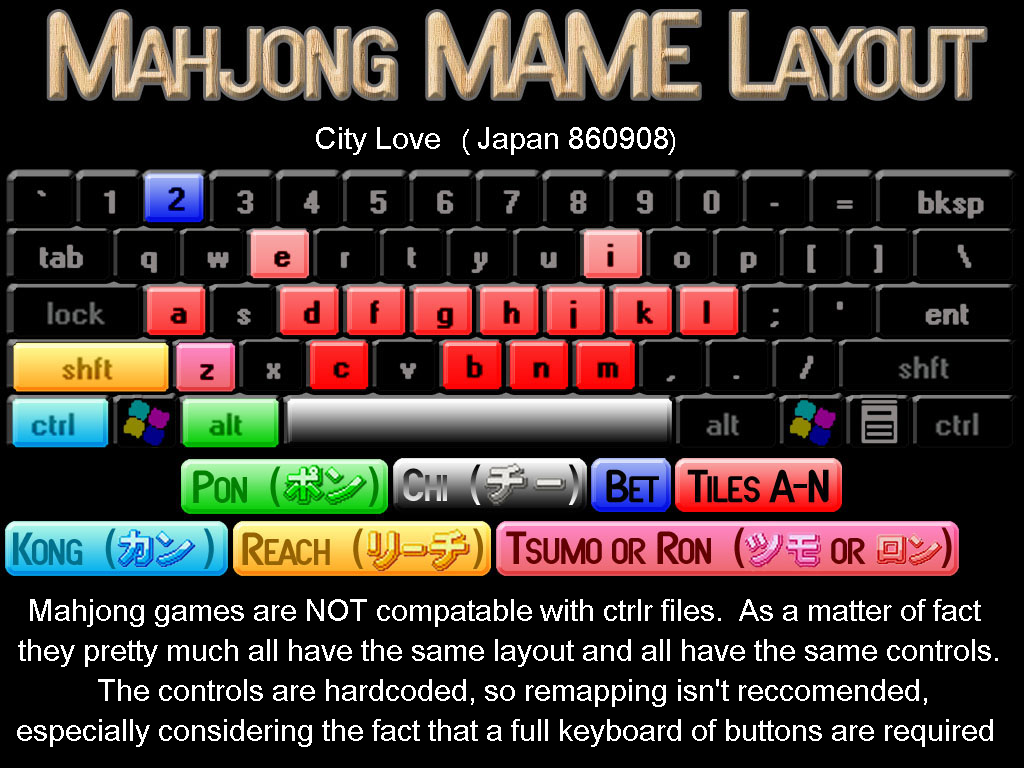
NOTE: The missing P1B2 in 1942 is not an error. Howard C does not use the Alt key for P1B2 to avoid Windows conflicts, so if you use a default MAME codeset, that button will not be shown.
THEORY OF OPERATION
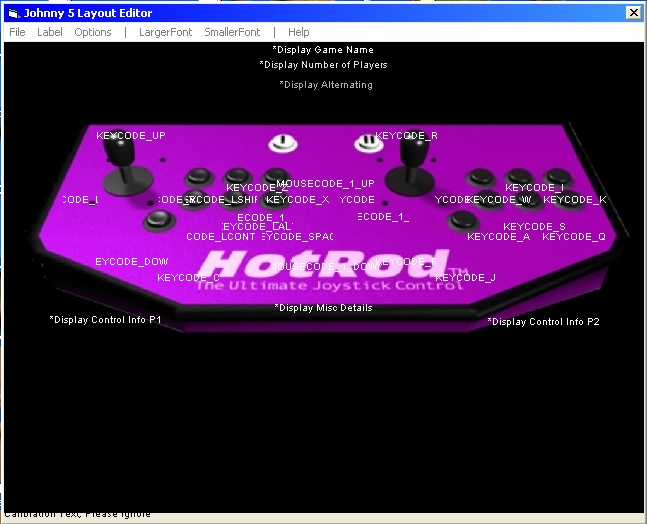
Johnny5 utilizes four files for operation - a background file (default mylayout.jpg), a layout file (default mylayout.lof), the controls.ini file (included with the distribution), and you MAME controller assignment files (and optionally a layout filters file (loffilters.txt). Here is a simplified explanation of how the "FIRE" label gets applied in 1942. (The order of events may not be correct, but this is the general theory.) (Currently, Johnny5 also needs to use the MAME.exe file to get the driver and parent info for the file, since controls.ini only includes clones if their controls are different from the parent.)
You send "Johnny5 1942". Johnny 5 then searches your MAME controller assignments and finds that 1942 uses LCtrl for P1 Button 1. Johnny5 than searches controls.ini and finds that P1 Button 1 functions as "FIRE" (along with finding out the game name and other details). Johnny5 then searches the loffilters.txt file for matching entries to the controls.ini data. Finally, Johnny finds the LCtrl label in the mylayout.lof file and determines where to place the label on the associated mylayout.jpg file and displays it.
LEVELS OF COMPLEXITY
Before we really get into "how" to set up Johnny5, it is good to take a second to look at levels of complexity and limitations to determine if the program will actually meet our requirements. There are about five levels of complexity that Johnny5 can be used at, and I am using between levels 3 and 4, so that is what I will cover on this page.
LIMITATIONS AND CONSIDERATIONS
The solution for all three situations is to define a .lof file which does not show these inputs (i.e. a 4-way .lof file not showing the inputs for the 8-way joystick), even though they are still connected, and then configure Johnny5 to use these.
PRELIMINARY SET-UP
Yes, I am finally going to tell you how to get started doing cool stuff with Johnny5.
First off, this is optional, but if you are using WinXP, I highly recommend installing the "Open Command Window Here" Powertoy from http://www.microsoft.com/windowsxp/downloads/powertoys/xppowertoys.mspx. This will let you right-click on a folder and have a command prompt pointing to it. Win98SE already includes this feature (although you might need TweakUI to add it). I'm not sure about other OS's. I will assume from here on that you have it installed. If you choose not to install it, you will have to navigate to the proper directory using "CD" commands as covered on the main page in the BuddaMAME instructions.
Other ways of adding this are shown here (Win2k), here (Win2k), here (Win2k), and here (Win98 up). In case all this fails (and for me in one case it did), you can simply copy cmd.exe from \WindowsRoot\System32\cmd.exe to the C:\johnny folder and double-click that.
DEFAULT INSTALLATION AND TESTING
Download Johnny5 Beta 2.1 from http://www.oscarcontrols.com/lazarus/ and unzip to C:\johnny. You can also find the MAME controller file conversion info there.
Now, double-click on C:\johnny\Johnny5.exe. It should give you an Introduction Window and put you on the options screen, but if not, go to "Options - Viewer". Do NOT change anything except "Path to MAME", "MAME exe" and "controller config" file in the following formats:
C:\mame\
mame.exe
XArcade (Example, or leave blank)
I highly recommend leaving the controller config tab blank. Johnny5 now does a very thorough job of searching your controller files and should find them whether you tell it where they are or not.
CAUTION: Unless it's changed recently, if you use a MAME .exe file like mameanalogxp.exe or mamepp.exe, you must have a properly configured mameanalogxp.ini or mamepp.ini, [even though later (~0.61 and up) versions of MAME can use a mame.ini file], for Johnny5 to work correctly.
NOTE: You can get serious errors (like every game using the mylayout.jpg background) if you change any of the other settings on this window. I am posting the contents of my C:\johnny\options.cfg file below in case your's get messed up and you want to get it back:
If you are using WinXP or Win2K (or NT?), you should be set up now. Right-click on the c:\johnny folder, select "Command Prompt Here", and type "Johnny5 1942" or "Johnny5 pacman" and Enter in the command window. The screen should briefly go black and then it should show the control panel above with your selected key assignments labeled by function (Remember, Howard re-mapped L Alt, so Button 2 might not show up correctly).
If you tried the above under Win98SE (or ME?), you will likely see a solid black screen indefinitely, however; you can exit it by pressing Alt-Tab, and close it by pressing Ctrl-Alt-Delete and ending "Project 1 (not responding)". Instead of doing that, right-click on the c:\johnny folder, select "Command Prompt Here", and type "Johnny5 1942 -debug" and Enter in the command window. Now you will see a Command Prompt for GetDriver and a Command Prompt for GetVersion flash by. Select the "GetVersion" command prompt from the status bar and right-click on the Title Bar and select Properties. Under the Program tab, select "Close on Exit" and click Ok. Now click the "X" in the upper right corner to close the Command Prompt Window. Johnny5 should resume running and you should get to the screen above. Sometimes this may not "Stick", so go back to the Command Prompt and run "Johnny5 1942". If it hangs, repeat the process with debug enabled and try clicking Apply instead of Ok on the Properties tab of any new command prompts that you can still see. This should eventually fix all the issues and get the program working.
Now, for all operating systems, right-click on C:\johnny, select "Command Prompt Here", run "Johnny5 area51" and verify you see the lightgun screen above, and run "Johnny citylove" and verify you see the Mahjong screen above.
Finally, run 1942 in MAME and change P1B1 to V. Go to the Johnny5 folder, run Johnny5 again, and verify that FIRE is now shown over the second button on the top row. (Don't forget to change it back later. . .)
These last steps are optional (especially if you saved the .zip files), but I recommend copying C:\johnny\layouts\default.lof to a new file and renaming it default-HC.lof, copying the C:\johnny\layouts\images\mylayout.jpg to mylayout-HC.jpg, and copying the C:\johnny\options.cfg to options-bak.cfg. This way you can tell what they are and if you get stuck and want to start over you can quickly get back where you were. I also recommend routinely getting the latest version of controls.ini from here and replacing the one in "C:\johnny\data files" periodically.
Now that the default layouts are working, it's time to build some custom ones!
CHEATING (J/K)
Some people have asked where I got the items to build my default layouts. There were a ton of sources - primarily, the buttons and joystick images were provided by RandyT of www.groovygamegear.com. He has graciously given me permission to release his images publicly (private, non-commercial use only). The real life control panel was also provided by him (for minor compensation), and I highly recommend dealing with him if you need a similar product. The design and layout of the panel was a collaborative effort. Since I had Word templates already (compliments of LusiD), it was simple to make a Word layout to test button placement on, then make a screen shot of the Word layout for the background image, then overlay the buttons above the screenshot. The arrowheads came out of an image package I found (with modifications), the horizontal buttons were made from a photograph (but I forget the source), and the tabs for the Prodigies were just done freehand.
If you would prefer to use my images as a base, or want to build a panel like mine and just use them directly, grab the .lof files here and extract them to C:\johnny\layouts, the backgrounds here (see the readme.txt, though) and extract them to C:\johnny\layouts\images, and the loffilters.txt here and extract it to "C:\johnny\data files".
CREATING CUSTOM LAYOUT FILES AND BACKGROUNDS
Please read through this entire section before beginning. I try to lay this out as "decide what you want, create .jpg file, modify layout file, save and relax". In reality, it is much more of a iterative process of "decide what you want, create .jpg file, modify layout file, modify .jpg file to suit layout file, modify layout file to suit modified .jpg file, etc".
If you want to get a feel for how the layered image files work and plan to use (or have access to Gimp), my layered .xcf (gimp-native format) file is available here. (See readme for usage restrictions, though). (More image sources will be provided below.)
The first step is to come up with an image of your panel. There are three ways to do this:
Once you have an image (or an idea how to make one), the next step is to decide on an image size for your mylayout.jpg file. Howard Casto's default image is 1024x768, and he recommends using a 4:3 ratio (for a horizontal monitor) (1024x768, 800x600, 640x480). Generally you want the image to be the same resolution that you run your frontend at, regardless of whether this is the same as your desktop or MAME resolution. (However, Johnny5 scales the images very well, and I basically skipped this step and set it up at 1024x768 b/c Howard used that, and it has worked out fine for me).
At this point, I am going to part ranks a little with Howard Casto. His readme recommends creating a layout from scratch. I recommend modifying the default layouts as little as possible, unless you hate the "Title-# Players-Panel-Details" format that we both used.
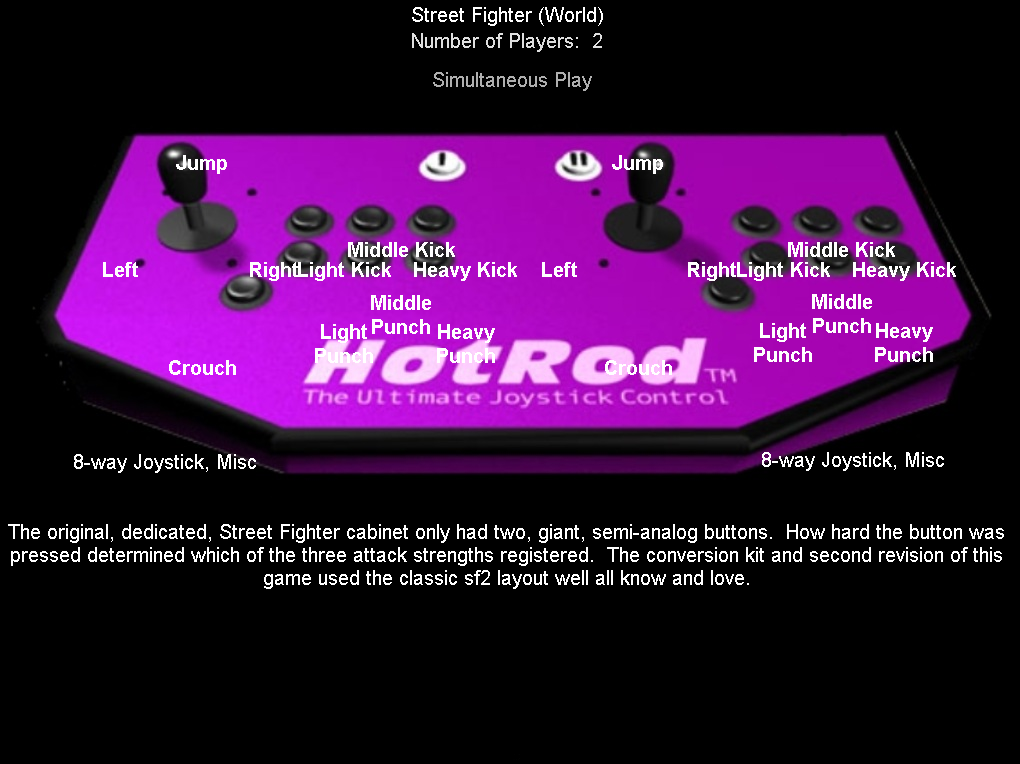
First, if you didn't earlier, download and install Irfanview and copy the main program file (usually I_VIEW32.EXE) to the C:\johnny folder. Just trust me. (No, you want to do this because this causes Johnny5's -justprint tag to save images in .PNG format rather than .BMP format). Now set Johnny5 up to use either my or the default layout (your preference). Set your desktop to the desired image resolution (FE resolution) and run a complicated image like Street Fighter, as follows: Right-click on the C:\johnny folder and select "Open Command Prompt" type Johnny5 sf -justprint and press Enter. You should see an image named controls.png in the C:\johnny folder. We will use this later as a "sizing template" for developing the background layout.
Okay, at this point, you should have an image of your panel (any size), and a controls.png file of Streetfighter in your FE resolution. I am going to walk you through creating a background layout file using GIMP.
When I built my background image, I had Word files to scale of what the controller would look like (thanks to LuciD's templates). I simply took a screenshot of this for the background image, then added the 3D buttons and joystick to it to finish it out. NOTE: It is likely best to start with a basic background image, do the initial scaling, and then add the buttons later).
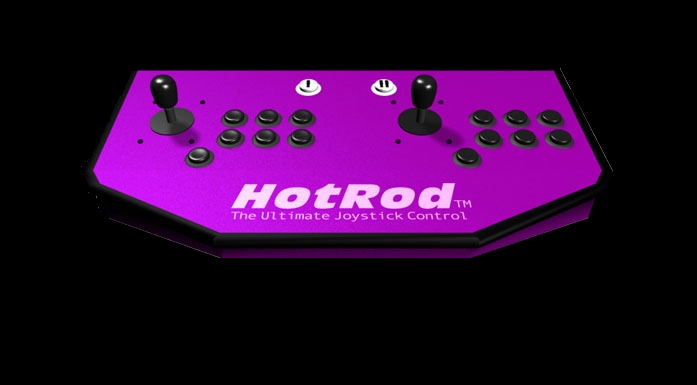
Let's say you have a HotRod SE as your controller (Howard be quiet . . .). I will start with Ciro's Emuloader image of the HotRod SE. (I'm sure there are more suitable images on the net, but I want to give you an example. We will modify the base image to "black out the background" as explained in the GIMP Hints under Graphic Editing above. Here are the original and modified images:
After saving the image on the right above, open Gimp, select Black for the background (click the double-arrows on the lower right) and select file new and set the image dimensions to our frontend resolution dimensions. Now right-click and select File and Open and select your panel image. Click in the new window, Select Copy. Click in the original window, select paste. Right Click and select Layers>Layers, Channels, and Paths. Select the floating selection and Right-Click and select Create New Layer. Now click on background. Click in the original window and select File and Open and open the controls.png (Street Fighter image). Click in the Street Fighter window, right-click and select copy. Click in the original window and select paste. Go to layers channels and paths, and save the floated layer as a new layer and move it down below the HotRod image. You should now have the file on the left below: The next step gets a little tricky. The idea is we want to select the HotRod layer, turn down the opacity so we can see it and the image below it, and the scale and move the layer so it is approximately positioned over the existing control panel. (In this case, we had to scale the image upward. A better base image or better planning would have allowed us to scale it down, which is always preferable) We now have the image on the right below:
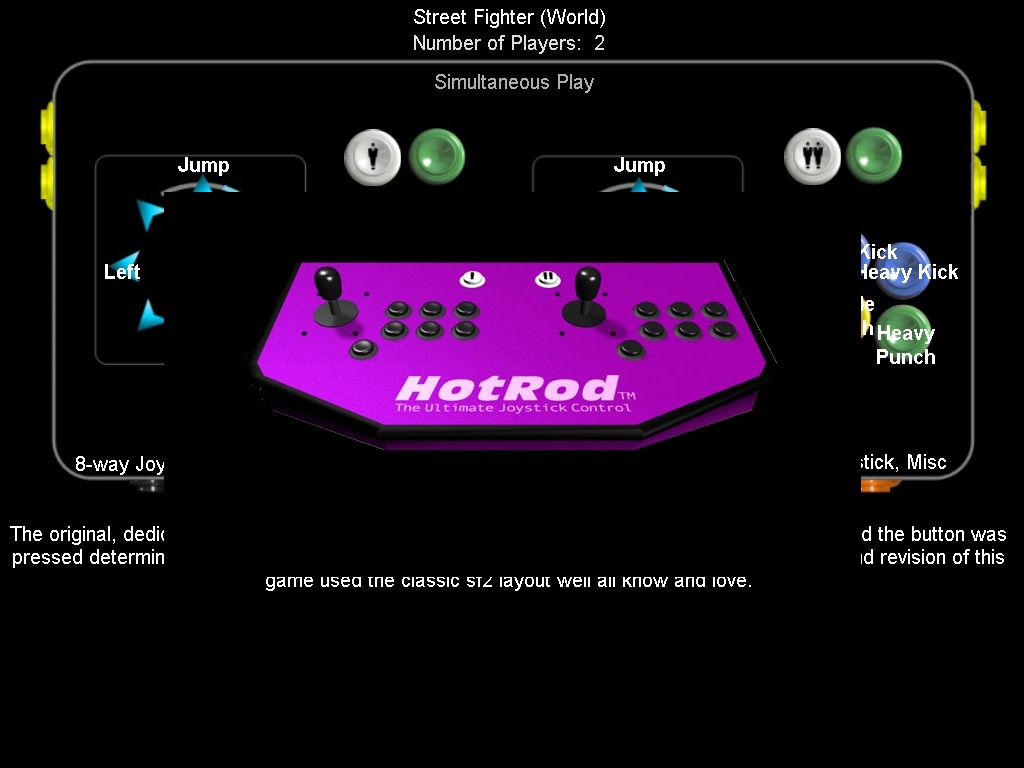
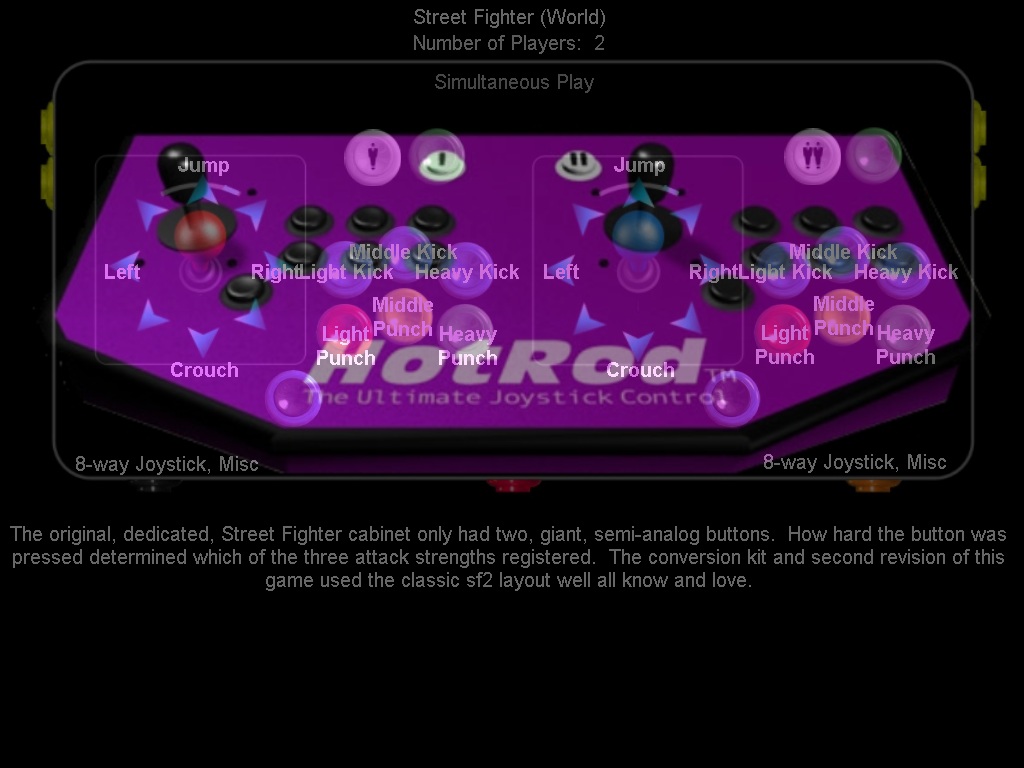
BTW, as you go along you will want to save your work. Sometimes you will save it as .PNG or .JPG files, but you also need to keep at least one or two version s in native .xcf (or .psd for Photoshop) as these versions retain the layer designations. Actually, the image above is not too terrible despite how it looks. Let's do a preliminary test. Turn the opacity on the HotRod layer all the way up and turn off visibility on the controls.png layer. This gives us the image on the left below: Now just for fun, let's play with it in Johnny5. You might want to copy the entire Johnny5 directory to a "test" folder so you don't mess up the working version. Now, after backing it up, copy your panel image (the image on the left) to C:\johnny\layouts\images\mylayout.jpg. You will also want to backup the loffilters.txt file and create a new file with almost all entries removed. Running Johnny5 -sf -justprint produces the image on the right below. Alright, it's not perfect (yet), but as Charlie Brown would say "all it needs is a little love." Actually as you can see (and the reason I started from a working image), the title, # of players, alternating/simultaneous text, Player Controls, and Misc Details are fine. The button labels are displayed, but are not well-positioned. It's functional the way it is, but we can make it better. We'll do that next:
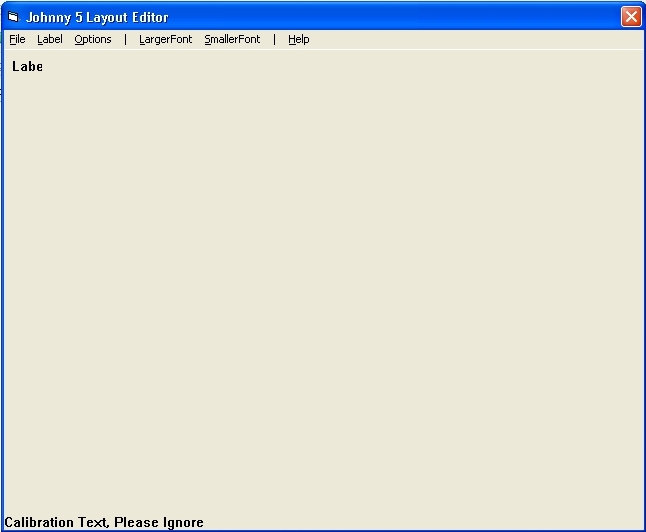
NOTE: The next step involves opening an existing layout in Johnny5's layout editor. Normally this works fine, but occasionally, you will get an image like the one below. This is most likely to happen with .lof files that were saved in Windows 98, and transferred to Windows XP, etc. Often the filename will be all uppercase even though it was not saved in uppercase originally. If this happens, the first thing to do is try renaming the file as lower case and then re-opening it. If it still doesn't work, try renaming it, and then if it works, change the name back to the original name. If that fails, open the file in Wordpad or Notepad, save it with a different name, and then change the name back to the original.
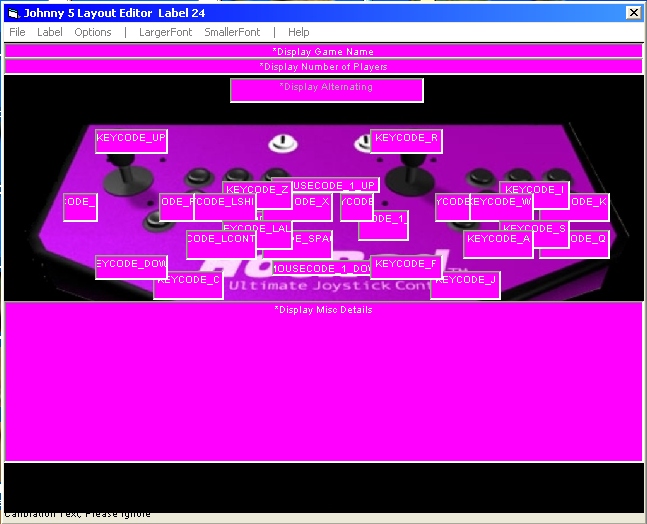
Assuming we are happy with the way the image looks, the next steps involve modifying the layout files in Johnny5. Assuming you have backed up the default.lof file, double-click on Johnny5.exe to open the layout editor, and select File-Open-Default.lof. You should see a screen like the one on the left below: This is good, but you cannot see the borders of the captions with a black background file and transparent label backgrounds. To "fix" this, press the "B" key, which gives you the image on the right (remember to set it back before you exit, or you'll have pink backgrounds on your labels): A couple of things to note: The layout editor does not "always" match the screen output. As you can see, Display Misc Details is shown as overwriting Display Control Info P#, but as you can tell from the screenshots it really doesn't, so basically, you end modifying the label size and position, then testing full-screen with a few games, then re-shuffling the labels, then retesting, etc. (Also, I don't recommend this, but it is possible to manually edit the .lof files entries. I had to do this when the layout editor wasn't working at all for me - (in between walking back and forth to work, in the snow, year-round, uphill both ways . . .) Information I found while doing this is posted in this thread from June 2004). Actually, I had to modify all my .lof files tonight (the uploaded ones are revised) and I found manual editing better if you want to make sure every label is exactly lined up and exactly the same size, etc.
So we shift the labels around, save the .lof file, run Johnny5 -sf and we get:
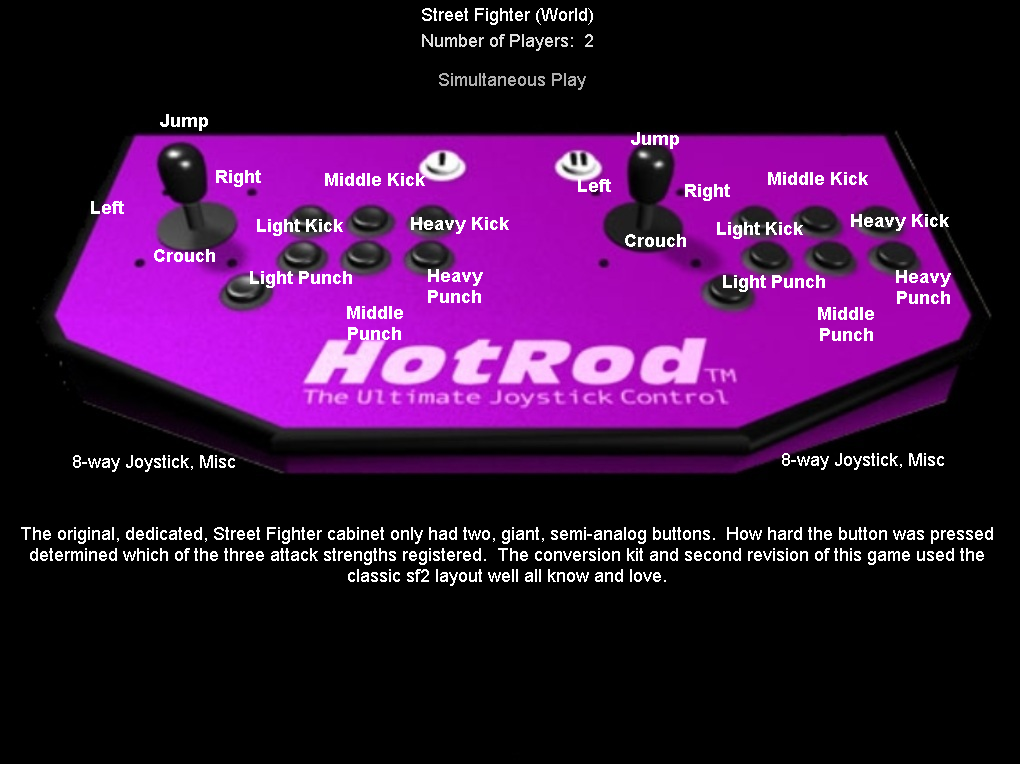
Not too shabby. The "Middle" upper and lower labels are too far away from the main buttons, but I don't feel like changing them for a tutorial. I think I finished the proof-of-concept. The modified .lof file that generated the above image is available here.
USING LOF FILTERS
Lof Filters are completely optional. For many users, if you are only using a controller like the HotRod controller above, or Howard's default layout, Johnny5 will work just fine for virtually all the games in MAME (at least to the level that the panel is usable for them. There are three situations in which Lof Filters would be required:
NOTE: Johnny5 is smart enough to ignore items in the loffilters.txt file that do not have a corresponding .lof entry in the C\johnny\layouts folder, so there is no problem having extra unused entries in the loffilters.txt file. Johnny5 is also smart enough to check the Simultaneous/Alternating entry, so 2Player alternating games are treated as single player since they use the same controls and both players share a single joystick.
WARNING: If you plan to use a similar .lof file to make multiple images (like I did with the same background file with directional arrows added), test LOTS of games first to make sure the default file is optimal before you start copying it over to make the new files. It's bad enough having to copy a file, change one line and rename a file 10 times, without doing that and finding out the labels should be 0.2 inches wider and having to re-do 10 files to change it instead of just one!!!!
Oddly, even though I had my loffilters working correctly (or so I thought), it turns out I didn't know what I was doing and had several errors. Fortunately, mahuti from BYOAC schooled me, so you won't be destined to repeat my mistakes. I have verified his data and am posting his comments in yellow below, with my changes in white. Thanks mahuti ! :
The
principal thing that the loffilters.txt file is good
for is arranging the order in
which .lof files are chosen. It could also be useful for removing any
extraneous controls that
you don't have. I'm guessing that most of controls.ini's
basic common
keywords are included, so there's not much extra to add, but a few
could be deleted. If a keyword is in the file and there is no
.lof file
to support it, it just defaults to default.lof . . . To avoid
using a
particular keyword .lof, you can delete the keyword from loffilters.txt
or delete the like-named .lof file (or rename it to
keyword.bak, if you might want to use it again later).
If you have all of the controls available to your panel, you could have
a loffilters.txt file like:
joy2way
vjoy2way
joy4way
joy8way
trackball
spinner
lightgun
etc.
Including
things like "1buttonjoy2way" in the lof file is unnecessary, as is
including game specific .lof file names like "digdug." Johnny5 will
search
the c:\johnny\layouts
folder for .lof files having combinations of the keywords in the
following
order (in the
c:\johnny\layouts folder):
default.lof
#playerdefault.lof
keyword.lof (starting with the first keyword in loffilters.txt)
more specific keyword.lof
#playerskeyword.lof
#buttonskeyword.lof
#players#buttonskeyword.lof
romname.lof
The
keywords are based on constant descriptions found in the controls.ini,
so adding other words to loffilters.txt is useless. The other
stuff is
searched in the LAYOUTS FOLDER, rather than the loffilters.txt, so
there is no need to add 1buttonjoy4way to the filter. This just needs
to be
added to the layouts as a .lof file (with associated image.
If you were passing dig dug it would search in
the following order (for instance)
default.lof
1playerdefault.lof (Since
Dig Dug is 2P alternating, the search is for 1player files.
If we
passed 1943 to Johnny5, it would search for 2player. Player
can
be lower-case or capital and Johnny5 will still use the correct .lof
file).
joy4way.lof
1playerjoy4way.lof
1buttonjoy4way.lof
1player1buttonjoy4way.lof
digdug.lof
Romname
.lof files trump everything. The loffilters.txt file for the above
could
just have joy4way in it and nothing else and it would find all of the
stuff above based on that. Without the word joy4way in that file, it
would search
default.lof
digdug.lof
Regardless of what Howard Casto says, the .lof files do not seem to be case sensitive to this point, and the more detailed versions of the keywords don't need to be in the loffilters.txt. (I think perhaps Howard Casto meant the lofffilters.txt entries needed to be case sensitive.)
2playerdefault.lof or 2PlayerDefault.lof or 2playerdefault.lof all seem to work. The debug program shows that it is looking for (for instance) 2player2buttonjoy4way.lof regardless of what Howard Casto implied about case sensitivity.
One other thing... you can add joystick (or just joy or other vague term) to the loffilters.txt file, and it will search for things like 1buttonjoystick.lof -- That's handy for me (Mahuti), because most of my configs are based on amount of buttons, not joystick types.
I imagine a search of controls.ini might find a few other gems that can be added to the loffilters.txt. But the things that get added to that have to come from controls.ini. Adding arbitrary keywords doesn't work.
Here is my loffilters.txt file, with some additional entries and my infamous Javascript ToolTips, to give you an idea of what is possible with loffilters.txt (Note that entries must match the data in controls.ini and are case-sensitive) Rather than provide a clean file for you, I adopted the following color coding: Blue entries are valid items that I did not have a panel for, so they could have been removed from loffilters.txt. Black entries are valid entries that need to be in the list (if you want a different layout for these items). Red entries are invalid items that I thought were okay, but should be removed. Yellow items are intentionally incorrect entries that I included just as examples of what NOT to include:
NOTE: By no means should you include all these entries in your loffilters.txt file. It is also important to note that controls.ini list both MAME type controls (joy4way) and Real-World controls (4-way Joystick) and you can search for either (with varying results):
The first step is to decide what you want to filter out and what images will be required.
For Case 1 above, say a Star Wars yoke controller, you would just make an image of the yoke, save and load it into the layout viewer, place the labels as required, and save the yoke image as C:\johnny\layouts\images\yoke.jpg and the .lof file as C:\johnny\layouts\yoke.lof. Make sure the first line of the .lof file reads BgImage=yoke.jpg and you should be set.
For Cases 2 or Cases 3 above - This is where an image editor with layering capabilities comes in handy. The idea is you will add the additional information (joystick arrows, grayed out buttons, etc.) as layers above your image. Now you can hide or show them as required and save them with the correct image name for each configuration. The positioning commands on the .lof files do not need to change, so the easiest thing is just to take your existing .lof file, make a copy of it, and change the BgImage line to point to the correct Background file. (For example, let's say I want a custom layout for 3Button games. I open the layered (Gimp .xcf or Photoshop .psd) file select layers to only show the three used buttons, and export the image as C:\johnny\layouts\images\3Button.jpg. Then I copy C:\johnny\layouts\default.lof to C:\johnny\layouts\3Button.lof. Finally, I edit C:\johnny\images\3Button.lof so that the BgImage line reads BgImage=3Button.)
NOTE: .lof filenames MUST match the entries in loffilters.txt, but image names do not need to match as long as the BgImage line in the .lof file points to the correct image.
At this point, Johnny5 should be working fine from the command line.
AUTOMATING JOHNNY5
Initial setup is by
far the hardest part of Johnny5. Automating it is much
simpler. The next step is to
decide which method you want to use to view Johnny5 and
then see this
page for Method 1 - Static Image
Viewing, this page for
Method 2 - Launch From Hotkey, this
page for
Method 3 - Launch Prior to MAME Launch, this
page for Method 4 - Launch AutoHotKey Script Along With MAME
- Johnny
Launches When MAME is Paused, and this
page for Method 5 - Launch
AutoHotKey Script Along With MAME - Johnny is Available From a HotKey.
