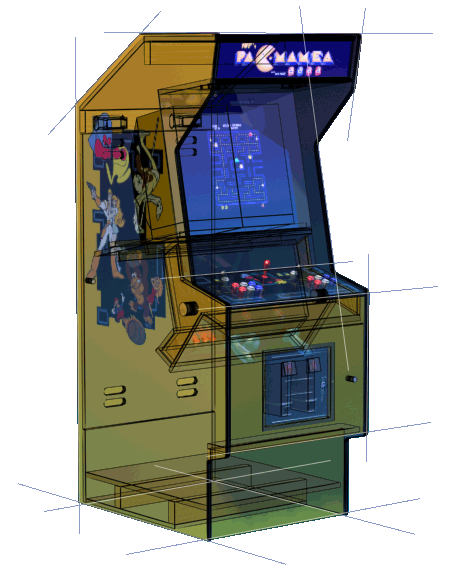
Go here for details on the construction of Pac-Mamea!


THE PLANS

After many requests, I have finally consolidated my notes into a set of blueprints for those who want to build their own cabinets!  You can download the plans HERE.  I also recommend consulting the following info for a better understanding of details not in the plans themselves.
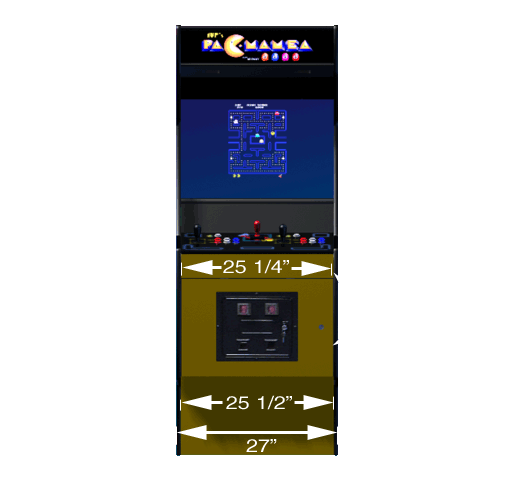
Note:  The measurements listed on the plans are based on many pages of notes and sketches.  Due to all the revisions before and during construction, some of my notes showed different numbers than others.  I have attempted to use the most recent data I could find, but due to the scale of this project, it would be too time consuming to go over the entire cabinet and verify all of the measurements.  I have included a 1" grid over all the plans, to aid you during construction.  I encourage you to verify all angles and measurements with the proper tools, before making any cuts or drills.
I have formatted the images to print at full size (1 grid line = 1 inch when printed) so that any part of the image can be printed and used as a 1:1 template for construction.  By using a program such as Photoshop or Paint Shop Pro, you can easily reduce the canvas size to 8.5x11", slide the plans around and print tiles, which can be joined together for a full scale blueprint!  Alternatively, you can reduce the image size, print the plans on a single page, and use the measurements as a guide.  You can also take accurate angle measurements from the plans.
To print the plans at FULL SIZE in Photoshop:  Go into the menu Image>Canvas size, change the units to Inches instead of Pixels, and type in 8.5 for width, and 11 for height.  Now you can slide the image around on the canvas with the move tool, printing each section separately, and leaving about 2 inches overlap at the edges to match them up.  Use a lightbox, or press the pages against a lit window to make sure the gridlines line up, and tape the pieces together.  You can easily transfer the measurements to your wood by scribbling on the back with a #2 (HB) pencil, taping the plans to the wood, and tracing firmly over the printed lines with a pencil and ruler.

To print the plans on ONE PAGE in Photoshop:  Go into the menu Image>Image Size and uncheck the Resample Image box.  Now it will let you change the "Document Size" (or printing size) so change this to 8.5 inches wide by 11 inches high.  This will now print on a standard page of paper, at
maximum resolution.
 

Construction Guidelines

(also refer to the General Construction and Rotating Control Panel pages for more info)

The basic dimensions of the cabinet are 27" wide x 71" high x 36 1/8" deep.  Including the wheels, the height becomes 72" (6 feet.)  Since the 27" width includes the 3/4" side panels, the actual width of all fixed panels is 25 1/2".  Fixed panels are the panels that hold the cabinet sides together, such as the base, the front and back kick plates, the monitor shelf, the speaker mounting shelf, and the roof of the cabinet.  The four 2x4 beams that form the basic frame of the cabinet should also be 25 1/2".
In order to allow the doors to open and the rotating panels to turn freely, there needs to be a 1/8" gap between the moving and fixed panels.  This means that the doors and control panel parts need to be 25 1/4" wide.

Also, in order to facilitate the roller latches that lock into the circular locking plate, the control panel end plates need to be inset from the each end of the control panel frame by about 3/8", making for a 1/2" gap between the CP ends and the cab side panels.  You will need to take this into consideration when laying out your controls, since there will be about 1" of unusable space on both ends of your control panels (assuming a 1/2" or 5/8" end plate.)
You should check your controllers against a full-size plan of the rotating control panel assembly, to make sure that the handles of all your controls will not protrude beyond the arc of rotation.  If your controls are too big, they may hit the bottom of the monitor shelf when turning.  If you intend to use Raider Pro handles as I did on my Tron control panel, you will need to change the angle of one of the panels.  Changing the panel from a 15 degree angle to a 12 degree angle should facilitate the Raider Pro handles.

One final note:  I have yet to make a limiting mechanism to prevent the panels from rotating 360o unchecked.  This means that the cables running out thru the PVC pipes could potentially become tangled after several turns.  I believe that this can be prevented by adding a bolt thru the inner pipe, and gluing the inner pipe permanently to the outer pipe, which in turn is glued into the 2" hole in the side panel.  The rotation would be limited by placing a screw in the end cap, in such a way that it catches on the bolt in the PVC when it is turned past postion 1.  Another screw could be placed so that the panels can not be rotated beyond position 3.  Now the panels can only be rotated from 1-2-3, or 3-2-1, and the cables will never tangle.
Download the plans HERE.


The information on this site is for the purposes of education and entertainment only.  The owner of this site makes no warantees as to the accuracy of the information, and takes no responsibility for any damage or injury sustained due to the use of information herein.  No ownership of copyrighted material found on this site should be implied unless otherwise noted.