DESIGN DESIGN
Pac-Mamea: The cabinet that almost wasn't...
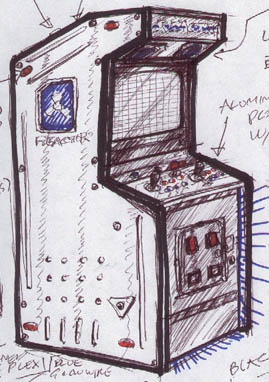
"The Reaktor" -- I know, pretty tacky, eh?
Some of you may remember how, on the
old website, I detailed a cabinet that was to be called "The Reaktor". The
Reaktor was to be a mechanical monstrosity, laminated with sheet aluminum etched and
stencilled with various designs, trimmed with black and yellow warning stripes, and lit
with LEDs and glowire in every conceivable location. Luckily, it was a year before I
was able to start building, and by that time I had come to my senses!
In fact, before it was called The
Reaktor, it had been STEALTH (STandalone Entertainment Arcade with Lighted Transformable
Hardware) and had taken many different forms in dozens of sketches. I have to laugh
when I look at my sketchbook and see old drawings labeled with such useful features as a
"flip-down BattleZone scope," or "retractable flight / race pedals!"
As my design evolved, I realized that I couldn't have a large monitor, and
still have room for a "pull-out Terminator 2 gun drawer!" So I pared down
my expectations a bit, and concentrated on just making a usable rotating control panel.
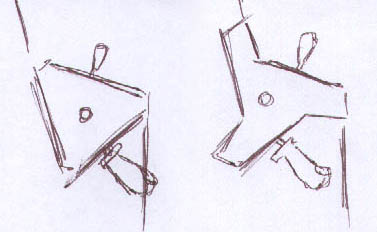
After making my prototype panels, I
realized that just using a triangular profile wouldn't allow all the controls to be
concealed inside the cabinet, without hitting the coin door. The panels would have
to be longer (almost 12" deep instead of 10".) Also, there would need to
be a moving "backsplash" panel to allow the trigger sticks to clear the monitor
shelf. This was originally going to be a separate panel that would just hinge out of
the way, but I realized it would be better if it was integral to the rotating assembly.
So my triangular panel system became more of a "shuriken" shape.
After many rough sketches, I knew that
I would have to start making more detailed scale drawings, which meant rulers, angles and
graph paper. That didn't sound like much fun, so I decided to do a detailed computer
model instead. I do graphics for film and television, so I already had the software.
I decided to use 3D Studio Max, since I was most familiar with how easily it
creates architectural and mechanical shapes.
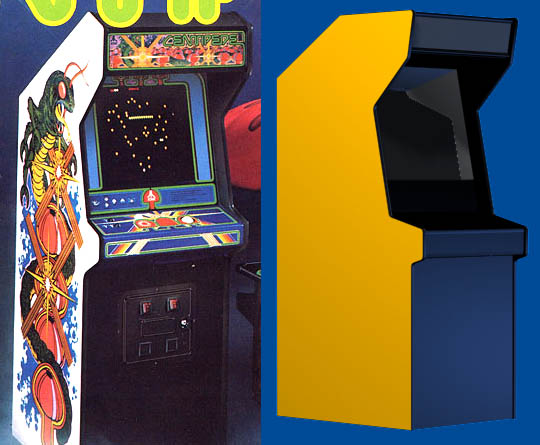
Also, at this point I decided to go
with a more traditional cabinet design, so I started browsing the Arcade Flyer Archive, looking at classic cabinets
for inspiration. One cab that really appealed to me was the Centipede cabinet.
My original model used a profile similar to Centipede, but with a more modern marquee
configuration to leave as much headroom as possible.
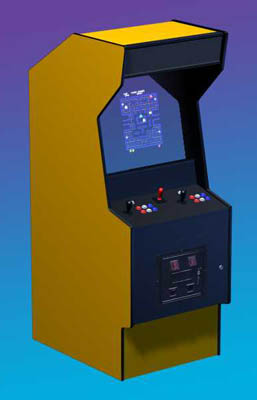
The next step was to begin building
simplified but dimensionally accurate models of all the controls I would be using on my
panels. This would ensure that the controls would have enough room to fit inside
without bumping into each other, and that the panels could be rotated successfully without
scraping on the monitor shelf or coin doors. This ended up saving my ass, because
the controls were not going to fit behind the coin door using a Centipede profile! I
revised the control panel overhang, moving the coin door forward into a more
"Defender-esque" configuration, and found that everything fit nicely.
Finally, everything seemed to be working on the 3D
model, so I was ready to build the real thing! Once I started cutting wood, I still
found a few design flaws, but a quick consulting of the model found a solution for any
last-minute woes.
Once primary construction was complete, the model came
in handy a couple more times. I was able to print out accurate full-size plans of
the control panel ends, and the control panels themselves for easy transferral to the
actual wood for cutting and drilling. I also applied all my artwork to the model, to
check the look before spending the money to have it all printed. In fact, the model
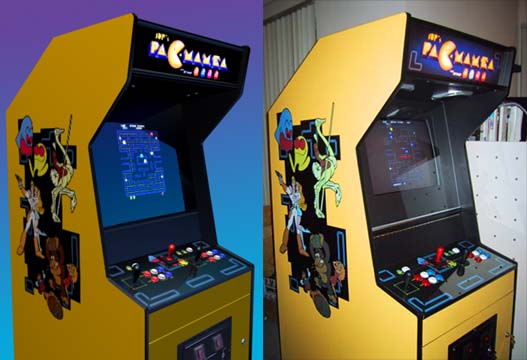
was so involved in every step of the construction, that it's hard to tell the difference
between the model and the real thing!
DESIGN = CONSTRUCTION = ARTWORK
= HARDWARE
= SOFTWARE
= DOWNLOADS |
| The
information on this site is for the purposes of education and
entertainment only. The owner of this site makes no warantees as to
the accuracy of the information, and takes no responsibility for any
damage or injury sustained due to the use of information herein. The
design of the Pac-Mamea cabinet and all photos, computer renderings,
drawings, schematics, and printed information relating to such are
Copyright © 2002-2004 Robert Meyers. No ownership of other
copyrighted material found on this site is implied. |