Dual
Tron Joystick Handles Dual
Tron Joystick Handles
Review and installation
Yeehaw! At long last, I've found an arcade
authentic replacement for my Raider Pro handles! I've been waiting
for a set of Tron sticks for about a year, when ArcadeRenovations.com was
planning on making a run of them. Finally, a guy named Tom (http://members.aol.com/specialtyplastic/)
came up with a mold of his own, and started selling them online. Note: the exact
color of these handles is very hard to photograph digitally, and even
Photoshop can't quite give me the true color of the plastic. But
trust me, they are a very deep aqua-blue, not nearly as green as the
photos make them seem. As far as I can tell, the actual handles are
true to the arcade color.
PRICING
First off, the grey handles that Happ
sells can be bought for about $12 a set -- but they are ugly grey.
Tom's prices may seem high in comparison, but they are about the same or
less than what the Arcade Renovations' Tron repros were supposed to be
($65-$75 as I remember.) It seems like he may be having trouble moving
them at his earlier prices, so he's now doing the 2 for $100 deal. I
personally got one blue set off ebay for $65, and ordered a red set by email
for $40. To me, the price seems fair, considering he molded them
himself in a very small quantity.
Now whether his pricing seems fair or not is up to you. Most of the
value is in getting brand-spankin-new handles that are the same color used
on the original Tron sticks. I've seen original Tron handles go for
anywhere from $19 to about $60+ on ebay, and lots of these are cracked,
scratched, or glued. It's also not a common item to find, and they are
usually hotly competed for. Many times, the halves are mismatched (two
rights or two lefts) or they are the Happ grey handles.
THE REVIEW
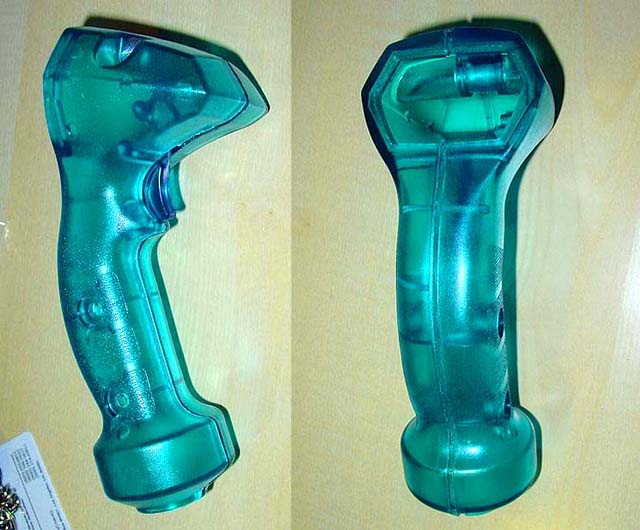
The quality seems very good. His
molds have captured minute detail, down to the grainy surface texture, and
the non-slip texture of the side grips.
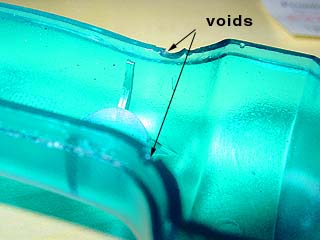
Tom often mentions small
"voids" that appear in the plastic. The voids in my handle
were mostly in the thin edge of the male half of the handle, which fits into
the female half, so they are completely invisible when assembled. This
seems to be because of air trapped in the very small channels in the mold
where this edge is formed. I can find no voids in any exterior
surfaces or visible parts of the handle. I should also mention that
there is a small amount of "flashing" around the straight edges
where the molds came together, which is easily removed with a razor blade.
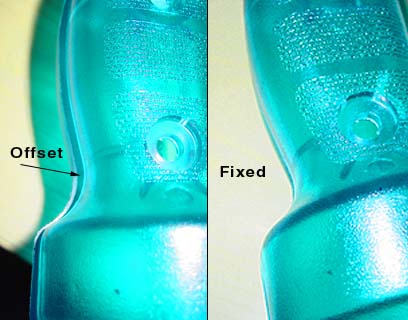
One thing that surprised me upon opening
the package was that the two halves didn't mate up properly -- the
"female" side of the grip was about 1/8" larger than the
"male" side. I emailed Tom, and he said the difference was
due to post-shipping warping of the plastic, probably from the heat of the
delivery truck. Since the handles were recently made, they are more
susceptible to heat until they cure fully. His advice was to heat them
with a hair dryer and bend the handle back into shape. Well, it
worked, and both halves now fit tightly together! Tom plans to start
oven-curing the handles in the future before shipping, so this shouldn't be
an issue with subsequent castings. Tom claims that his molds are so
good, you can mate half of one of his handles with half of an NOS handle for
a perfect fit...
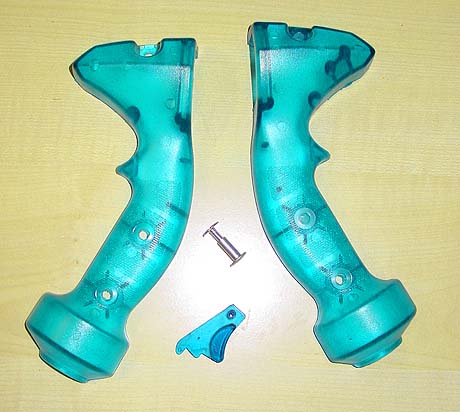
When I received the blue handle today,
it included a blue molded trigger, and a two-piece machine screw that holds
the top together. Anyone purchasing these will have to order
additional parts from Happ, mainly the bracket and return spring for the
trigger switch, and the trigger switch itself. You'll also need to put
in some kind of insert in the hexagonal window on the back of the stick,
which Happ also sells, in addition to thumb switches. You may also
want to order the screws for all these parts, especially the ones that go
through the sticks to hold the halves together.
 NOW
FOR THE INSTALLATION! NOW
FOR THE INSTALLATION!

Here
you can see all the parts from Happ installed. As you can see, it all
fits pretty nicely, except for the trigger switch, which has very long
contact tabs. I bent the tabs down so they fit inside the handle.
I ordered the backplate with 2 holes in case I ever decide to add another
thumbswitch, but for now, an artwork insert will cover the extra hole.
Here's a list of the required parts and their prices:
Item#, Description, (Qty) $PriceEach
43-0013-00 2-56 X 3/8 SCR SLOTTED ROUND HEAD MS ZINC PLATED (4)
$0.28
95-4278-00 SWITCH ASSY DA3 TRIGGER (2) $2.40
90-1012-00 SCREW,#4X3/4 PHIL.PAN HD SHEET METAL TYPE AB (4)
$0.36
96-4101-00 TRIGGER SWITCH BRACKET HD J/S (2) $4.41
50-8357-00 SPRING RETURN F/TRIGGER SWITCH F/ ANALOG JOYSTICKS
(2) $1.52
95-4400-06 THUMBSWITCH ASSY,BLK, DA3 (2) $10.49
96-2542-02 BACKPLATE HD J/S BLACK 2 HOLES (2) $2.30
(Note:
You can order the backplate as 96-2542-01 for 1 button hole, or 96-2542-00
for no holes)
Order Total: $44.80
As you can see, the thumbswitches were by far the most expensive item, even
more expensive than the whole trigger bracket/switch/spring assembly!
Don't ask me why the small pushbutton that screws onto a standard cherry
microswitch is so expensive, but I had to have them... 
You'll also need the screws that mount the trigger spring to the bracket,
but Happ only sells them in lots of 100, for about $14. I only needed
4 of them, so I bought the same thing at Home Depot (#4-40 x 1/4" pan
head zinc machine screws) for $0.87 for a bag of 10.
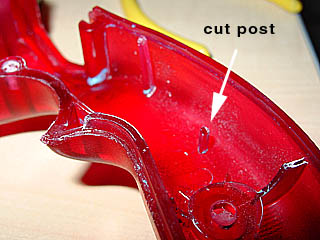
Before you can mount the trigger
bracket, there's a thin post in the way that you'll need to cut. Cut
off about half of the post, and you'll be good to go.
Happ sells an angled metal shaft that
the handle mounts to. This shaft is too long to be able to mount it
to a Super or Competition stick without it being too high above the CP.
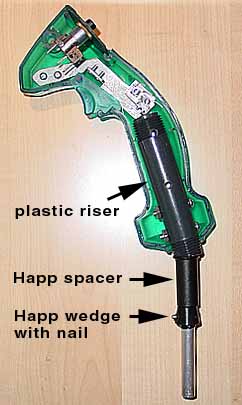
The shaft also costs about $24.  I made my own shaft from a 1/2" x 3" plastic sprinkler riser
(about $0.45 each at Home Depot).
I bent the hollow aluminum shaft that I had been using to mount my old
Raider Pro handles, and bolted them inside the riser. I then cut an
angle at the bottom of the riser and slid a Happ Super shaft-length spacer
onto the aluminum shaft to meet up with it. I also cut about
1/4" off the bottom of the shaft-length spacer to lower the sticks so
that they ride just about 1/4" off the top of my CP. This helps
keep the sticks from hitting the bottom of the monitor glass when I rotate
my panels.
I made my own shaft from a 1/2" x 3" plastic sprinkler riser
(about $0.45 each at Home Depot).
I bent the hollow aluminum shaft that I had been using to mount my old
Raider Pro handles, and bolted them inside the riser. I then cut an
angle at the bottom of the riser and slid a Happ Super shaft-length spacer
onto the aluminum shaft to meet up with it. I also cut about
1/4" off the bottom of the shaft-length spacer to lower the sticks so
that they ride just about 1/4" off the top of my CP. This helps
keep the sticks from hitting the bottom of the monitor glass when I rotate
my panels.
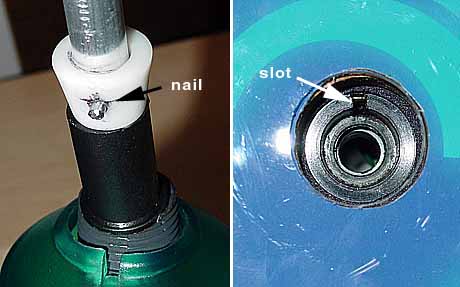
Last, I slid the usual Happ
wedge-shaped spacer (the one that goes into the top of the Super base)
onto the shaft, drilled a 7/64" hole thru the spacer into the
aluminum shaft, and tapped a cut piece of a nail thru the hole to act as a
rotation restrictor. The nail fits into a slot cut into the hole in
the top of the Super joystick's base, so that the Tron stick can not be
turned around backwards, but it can still be pushed in any direction
freely. The nail must not be put too high on the wedge spacer, or
else it may pop out of the slot when the stick is pushed down...1/8"
from the bottom of the spacer is about right. Also, the nail should
protrude no more than 1/8" out from the spacer, or it will rub on the
main spring inside the joystick base. If it is much shorter, it will
not stay in the slot.
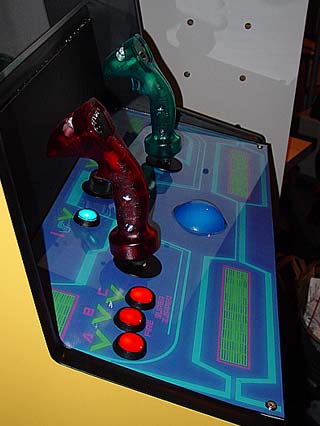
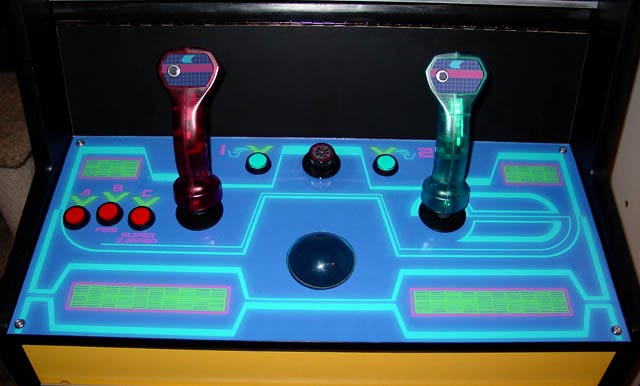
Looking good so far! I'm really
glad I decided to go with the two colored sticks. The red looks good
next to the red buttons, and the blue looks nice next to the illuminated
blue trackball. Also, the red compliments the color of the
aqua-blue stick.
So, maybe this was an expensive project, but I'm really glad that I was
able to get brand new handles, with no cracks, wear, or tear. The
Tron shape is instantly recognizable (my coworker knew right away what
they were when I got them  )
and are definitely classier than the old Raider Pro handles. I probably
won't be adding glowire inside these babies, they look good as they are.
I may possibly add a small blacklight and additional Tron artwork to the
splash panel for added authenticity. I will most likely get one of
Oscar's new anodized black DOT spinner knobs to complete the look, and possibly one of
his up/down spinners to go with it... )
and are definitely classier than the old Raider Pro handles. I probably
won't be adding glowire inside these babies, they look good as they are.
I may possibly add a small blacklight and additional Tron artwork to the
splash panel for added authenticity. I will most likely get one of
Oscar's new anodized black DOT spinner knobs to complete the look, and possibly one of
his up/down spinners to go with it...
|