OK now you have a target board and a programmer next you will use the software you installed in step 2 to talk to the chip. This software is very powerful but its also difficult to use the first time. However, you should persevere and after a few times it will become (easier) to use.
Comments? Suggestions? Post to the forum!
Avrdude is a command line program, so you'll have to type in all the commands (later you'll find out how to shortcut this with a Makefile)
Under Windows, you'll need to open up a command window, select Run... from the Start Menu and type in cmd and hit OK.


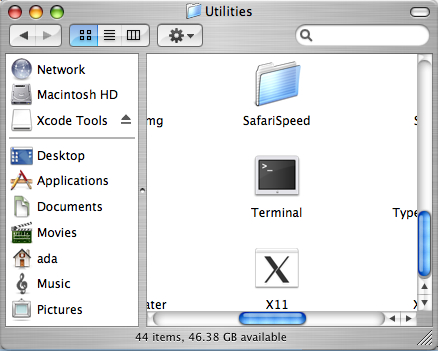
Under MacOS X, you can use the Terminal program to pull up a command line interface, its in the Utilities folder
Now in the new terminal window type in avrdude you should get this response, which is basically a simple list of what avrdude can do...
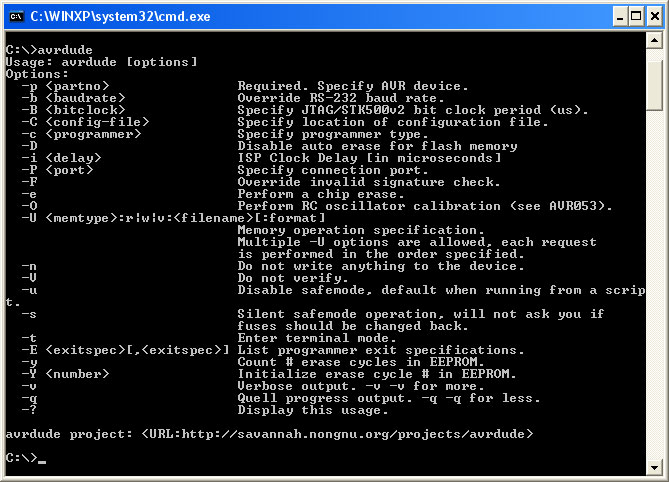
There are a lot of options, lets review them quickly. Don't try to memorize them, just get a sense of what some of them may do.
- : This is just to tell it what microcontroller its programming. For example, if you are programming an ATtiny2313, use attiny2313 as the partnumber
- -b <baudrate>: This is for overriding the serial baud rate for programmers like the STK500. Don't use this switch, the default is correct.
- -B <bitrate>: This is for changing the bitrate, which is how fast the programmer talks to the chip. If your chip is being clocked very slowly you'll need to talk slowly to it to let it keep up. It'll be discussed later, for now don't use it.
- -C <config-file>: The config file tells avrdude about all the different ways it can talk to the programmer. Theres a default configuration file, so lets just use that: don't use this command switch
- -c <programmer>: Here is where we specify the programmer type, if you're using an STK500 use stk500, if you're using a DT006 programmer use dt006, etc.
- -D: This disables erasing the chip before programming. We don't want that so don't use this command switch.
- -P <port>: This is the communication port to use to talk to the programmer. It might be COM1 for serial or LPT1 for parallel or USB for, well, USB.
- -F: This overrides the signature check to make sure the chip you think you're programming is. The test is strongly recommended as it tests the connection, so don't use this switch.
- -e: This erases the chip, in general we don't use this because we auto-erase the flash before programming.
- OK this one is the important command. Its the one that actually does the programming. The <memtype> is either flash or eeprom (or hfuse, lfuse or efuse for the chip configuration fuses, but we aren't going to mess with those). the r|w|v means you can use r (read) w (write) or v (verify) as the command. The <filename> is, well, the file that you want to write to or read from. and [:format] means theres an optional format flag. We will always be using "Intel Hex" format, so use i
So, for example. If you wanted to write the file test.hex to the flash memory, you would use -U flash:w:test.hex:i. If you wanted to read the eeprom memory into the file "eedump.hex" you would use -U eeprom:r:eedump.hex:i - -n: This means you don't actually write anything, its good if you want to make sure you don't send any other commands that could damage the chip, sort of a 'safety lock'.
- -V: This turns off the auto-verify when writing. We want to verify when we write to flash so don't use this.
- -u: If you want to modify the fuse bits, use this switch to tell it you really mean it.
- -t: This is a 'terminal' mode where you can type out commands in a row. Don't use this, it is confusing to beginners.
- -E: This lists some programmer specifications, don't use it.
- -v: This gives you 'verbose' output...in case you want to debug something. If you want you can use it, but in general we won't.
- -q: This is the opposite of the above, makes less output. In general we won't use it but maybe after a while you wold like to.
The ones you'll use 99% of the time are highlighted in red. Let's review them in more detail
To get a list of supported programmers, type in avrdude -c asdf (asdf is just some nonsense to get it to spit out the list of programmers) Here is my output, yours may vary a little. Don't bother memorizing it, just glance through the list.
C:\>avrdude -c asdf
avrdude: Can't find programmer id "asdf"
Valid programmers are:
dasa3 = serial port banging, reset=!dtr sck=rts mosi=txd miso=cts [C:\WinAVR\bin\avrdude.conf:763]
dasa = serial port banging, reset=rts sck=dtr mosi=txd miso=cts [C:\WinAVR\bin\avrdude.conf:750]
siprog = Lancos SI-Prog <http://www.lancos.com/siprogsch.html> [C:\WinAVR\bin\avrdude.conf:737]
ponyser = design ponyprog serial, reset=!txd sck=rts mosi=dtr miso=cts [C:\WinAVR\bin\avrdude.conf:724]
frank-stk200 = Frank STK200 [C:\WinAVR\bin\avrdude.conf:689]
blaster = Altera ByteBlaster [C:\WinAVR\bin\avrdude.conf:676]
ere-isp-avr = ERE ISP-AVR <http://www.ere.co.th/download/sch050713.pdf> [C:\WinAVR\bin\avrdude.conf:666]
atisp = AT-ISP V1.1 programming cable for AVR-SDK1 from <http://micro-research.co.th/> [C:\WinAVR\bin\avrdude.conf:656]
dapa = Direct AVR Parallel Access cable [C:\WinAVR\bin\avrdude.conf:645]
xil = Xilinx JTAG cable [C:\WinAVR\bin\avrdude.conf:632]
futurlec = Futurlec.com programming cable. [C:\WinAVR\bin\avrdude.conf:615]
abcmini = ABCmini Board, aka Dick Smith HOTCHIP [C:\WinAVR\bin\avrdude.conf:605]
picoweb = Picoweb Programming Cable, http://www.picoweb.net/ [C:\WinAVR\bin\avrdude.conf:595]
sp12 = Steve Bolt's Programmer [C:\WinAVR\bin\avrdude.conf:584]
alf = Nightshade ALF-PgmAVR, http://nightshade.homeip.net/ [C:\WinAVR\bin\avrdude.conf:568]
bascom = Bascom SAMPLE programming cable [C:\WinAVR\bin\avrdude.conf:558]
dt006 = Dontronics DT006 [C:\WinAVR\bin\avrdude.conf:548]
pony-stk200 = Pony Prog STK200 [C:\WinAVR\bin\avrdude.conf:536]
stk200 = STK200 [C:\WinAVR\bin\avrdude.conf:520]
bsd = Brian Dean's Programmer, http://www.bsdhome.com/avrdude/ [C:\WinAVR\bin\avrdude.conf:509]
pavr = Jason Kyle's pAVR Serial Programmer [C:\WinAVR\bin\avrdude.conf:501]
dragon_dw = Atmel AVR Dragon in debugWire mode [C:\WinAVR\bin\avrdude.conf:494]
dragon_hvsp = Atmel AVR Dragon in HVSP mode [C:\WinAVR\bin\avrdude.conf:486]
dragon_pp = Atmel AVR Dragon in PP mode [C:\WinAVR\bin\avrdude.conf:478]
dragon_isp = Atmel AVR Dragon in ISP mode [C:\WinAVR\bin\avrdude.conf:470]
dragon_jtag = Atmel AVR Dragon in JTAG mode [C:\WinAVR\bin\avrdude.conf:462]
jtag2dw = Atmel JTAG ICE mkII in debugWire mode [C:\WinAVR\bin\avrdude.conf:454]
jtag2isp = Atmel JTAG ICE mkII in ISP mode [C:\WinAVR\bin\avrdude.conf:446]
jtag2 = Atmel JTAG ICE mkII [C:\WinAVR\bin\avrdude.conf:438]
jtag2fast = Atmel JTAG ICE mkII [C:\WinAVR\bin\avrdude.conf:430]
jtag2slow = Atmel JTAG ICE mkII [C:\WinAVR\bin\avrdude.conf:422]
jtagmkII = Atmel JTAG ICE mkII [C:\WinAVR\bin\avrdude.conf:414]
jtag1slow = Atmel JTAG ICE (mkI) [C:\WinAVR\bin\avrdude.conf:407]
jtag1 = Atmel JTAG ICE (mkI) [C:\WinAVR\bin\avrdude.conf:399]
jtagmkI = Atmel JTAG ICE (mkI) [C:\WinAVR\bin\avrdude.conf:391]
avr911 = Atmel AppNote AVR911 AVROSP [C:\WinAVR\bin\avrdude.conf:385]
avr109 = Atmel AppNote AVR109 Boot Loader [C:\WinAVR\bin\avrdude.conf:379]
butterfly = Atmel Butterfly Development Board [C:\WinAVR\bin\avrdude.conf:373]
usbtiny = USBtiny simple USB programmer [C:\WinAVR\bin\avrdude.conf:367]
usbasp = USBasp, http://www.fischl.de/usbasp/ [C:\WinAVR\bin\avrdude.conf:361]
avr910 = Atmel Low Cost Serial Programmer [C:\WinAVR\bin\avrdude.conf:355]
stk500hvsp = Atmel STK500 V2 in high-voltage serial programming mode [C:\WinAVR\bin\avrdude.conf:349]
stk500pp = Atmel STK500 V2 in parallel programming mode [C:\WinAVR\bin\avrdude.conf:343]
stk500v2 = Atmel STK500 Version 2.x firmware [C:\WinAVR\bin\avrdude.conf:337]
stk500v1 = Atmel STK500 Version 1.x firmware [C:\WinAVR\bin\avrdude.conf:331]
stk500 = Atmel STK500 [C:\WinAVR\bin\avrdude.conf:325]
avrisp2 = Atmel AVR ISP mkII [C:\WinAVR\bin\avrdude.conf:315]
avrispmkII = Atmel AVR ISP mkII [C:\WinAVR\bin\avrdude.conf:309]
avrispv2 = Atmel AVR ISP V2 [C:\WinAVR\bin\avrdude.conf:303]
avrisp = Atmel AVR ISP [C:\WinAVR\bin\avrdude.conf:297]
You'll note that the programmers mentioned before are listed here, including the avrisp, avrispv2, stk500, dragon, dasa/dasa3/ponyser (serial port bitbanging programmers), dapa/dt006/stk200 (parallel port bitbanging programmers)
Look up the name of the programmer you're using, and commit it to heart!
To get a list of parts supported by avrdude, type in avrdude -c avrisp (it doesnt matter if you're not useing an avrisp programmer) without a part number into the command line. Don't memorize this list, just glance over it to get an idea of the chips that are supported.
C:\>avrdude -c avrisp
avrdude: No AVR part has been specified, use "-p Part"
Valid parts are:
m6450 = ATMEGA6450 [C:\WinAVR\bin\avrdude.conf:10974]
m3250 = ATMEGA3250 [C:\WinAVR\bin\avrdude.conf:10785]
m645 = ATMEGA645 [C:\WinAVR\bin\avrdude.conf:10596]
m325 = ATMEGA325 [C:\WinAVR\bin\avrdude.conf:10407]
usb1287 = AT90USB1287 [C:\WinAVR\bin\avrdude.conf:10219]
usb1286 = AT90USB1286 [C:\WinAVR\bin\avrdude.conf:10030]
usb647 = AT90USB647 [C:\WinAVR\bin\avrdude.conf:9841]
usb646 = AT90USB646 [C:\WinAVR\bin\avrdude.conf:9651]
t84 = ATtiny84 [C:\WinAVR\bin\avrdude.conf:9468]
t44 = ATtiny44 [C:\WinAVR\bin\avrdude.conf:9286]
t24 = ATtiny24 [C:\WinAVR\bin\avrdude.conf:9104]
m2561 = ATMEGA2561 [C:\WinAVR\bin\avrdude.conf:8911]
m2560 = ATMEGA2560 [C:\WinAVR\bin\avrdude.conf:8718]
m1281 = ATMEGA1281 [C:\WinAVR\bin\avrdude.conf:8530]
m1280 = ATMEGA1280 [C:\WinAVR\bin\avrdude.conf:8341]
m640 = ATMEGA640 [C:\WinAVR\bin\avrdude.conf:8153]
t85 = ATtiny85 [C:\WinAVR\bin\avrdude.conf:7972]
t45 = ATtiny45 [C:\WinAVR\bin\avrdude.conf:7793]
t25 = ATtiny25 [C:\WinAVR\bin\avrdude.conf:7613]
pwm3 = AT90PWM3 [C:\WinAVR\bin\avrdude.conf:7431]
pwm2 = AT90PWM2 [C:\WinAVR\bin\avrdude.conf:7247]
t2313 = ATtiny2313 [C:\WinAVR\bin\avrdude.conf:7060]
m168 = ATMEGA168 [C:\WinAVR\bin\avrdude.conf:6872]
m88 = ATMEGA88 [C:\WinAVR\bin\avrdude.conf:6686]
m48 = ATMEGA48 [C:\WinAVR\bin\avrdude.conf:6499]
t861 = ATTINY861 [C:\WinAVR\bin\avrdude.conf:6311]
t461 = ATTINY461 [C:\WinAVR\bin\avrdude.conf:6122]
t261 = ATTINY261 [C:\WinAVR\bin\avrdude.conf:5933]
t26 = ATTINY26 [C:\WinAVR\bin\avrdude.conf:5776]
m8535 = ATMEGA8535 [C:\WinAVR\bin\avrdude.conf:5618]
m8515 = ATMEGA8515 [C:\WinAVR\bin\avrdude.conf:5460]
m8 = ATMEGA8 [C:\WinAVR\bin\avrdude.conf:5300]
m161 = ATMEGA161 [C:\WinAVR\bin\avrdude.conf:5160]
m32 = ATMEGA32 [C:\WinAVR\bin\avrdude.conf:4985]
m6490 = ATMEGA6490 [C:\WinAVR\bin\avrdude.conf:4792]
m649 = ATMEGA649 [C:\WinAVR\bin\avrdude.conf:4607]
m3290 = ATMEGA3290 [C:\WinAVR\bin\avrdude.conf:4424]
m329 = ATMEGA329 [C:\WinAVR\bin\avrdude.conf:4239]
m169 = ATMEGA169 [C:\WinAVR\bin\avrdude.conf:4059]
m163 = ATMEGA163 [C:\WinAVR\bin\avrdude.conf:3916]
m162 = ATMEGA162 [C:\WinAVR\bin\avrdude.conf:3720]
m644 = ATMEGA644 [C:\WinAVR\bin\avrdude.conf:3530]
m324 = ATMEGA324 [C:\WinAVR\bin\avrdude.conf:3338]
m164 = ATMEGA164 [C:\WinAVR\bin\avrdude.conf:3146]
m16 = ATMEGA16 [C:\WinAVR\bin\avrdude.conf:2968]
c128 = AT90CAN128 [C:\WinAVR\bin\avrdude.conf:2777]
m128 = ATMEGA128 [C:\WinAVR\bin\avrdude.conf:2599]
m64 = ATMEGA64 [C:\WinAVR\bin\avrdude.conf:2418]
m103 = ATMEGA103 [C:\WinAVR\bin\avrdude.conf:2278]
8535 = AT90S8535 [C:\WinAVR\bin\avrdude.conf:2157]
8515 = AT90S8515 [C:\WinAVR\bin\avrdude.conf:2043]
4434 = AT90S4434 [C:\WinAVR\bin\avrdude.conf:1960]
4433 = AT90S4433 [C:\WinAVR\bin\avrdude.conf:1836]
2343 = AT90S2343 [C:\WinAVR\bin\avrdude.conf:1712]
2333 = AT90S2333 [C:\WinAVR\bin\avrdude.conf:1627]
2313 = AT90S2313 [C:\WinAVR\bin\avrdude.conf:1514]
4414 = AT90S4414 [C:\WinAVR\bin\avrdude.conf:1401]
1200 = AT90S1200 [C:\WinAVR\bin\avrdude.conf:1286]
t15 = ATtiny15 [C:\WinAVR\bin\avrdude.conf:1153]
t13 = ATtiny13 [C:\WinAVR\bin\avrdude.conf:980]
t12 = ATtiny12 [C:\WinAVR\bin\avrdude.conf:847]
t11 = ATtiny11 [C:\WinAVR\bin\avrdude.conf:783]
That's all the chips that avrdude knows about. Almost all of them are ISP programmable.
Watch out: t2313 and 2313, m8 and m88, c128 and m128, etc look very similar but they are in fact quite different chips! For that reason I suggest you type out the name of the chip, that is, instead of t2313 use attiny2313 or m8 use atmega8. Avrdude is smart enough to know what you mean if you type out the full name.
We're going to use the ATtiny2313 so use the part number attiny2313 or (t2313)
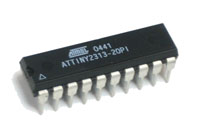
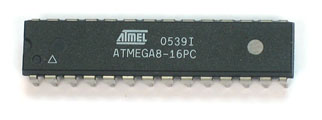
Double check what chip you are using by looking at the top of the chip, these say ATTINY2313 and ATMEGA8 (respectively) the -20PI and -16PC are just the speed ratings and package descriptions so ignore them for now.
This switch tells avrdude where to look for your programmer. If you are using a USB connected device, you can just use -P usb or, leave it out. The programmer automatically knows when the programmer is a USB device.
If you are using a parallel port or serial port programmer, you should use this option to indicate what port the programmer is connected to. 99% of the time its lpt1 (parallel) or com1 (serial) but you can always check it by looking under the Device Manager. Open the System Properties control panel
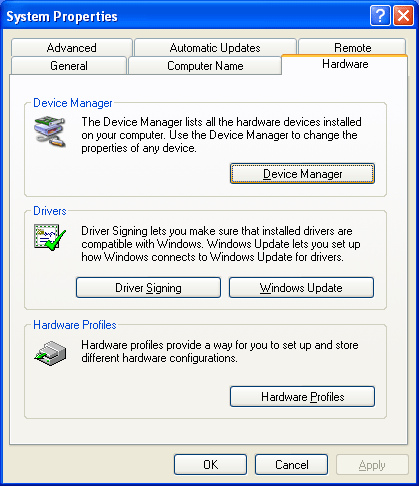
Click on Device Manager, and open up the Ports submenu.
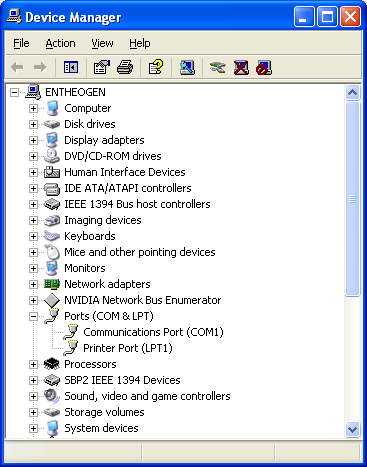
All of the serial and parallel ports are listed. There may be multiple COM ports but there's usually only one parallel (printer) port.
For Mac's, there are no parallel ports. However, if you're using a USB-serial adapter (which lets you use an STK500 or AVRISP v1 with a Mac) then you'll need to specify the serial port. I don't know a foolproof way yet but the way I do it is in the Terminal I type in ls -l /dev/cu.* and it will spit out a bunch of stuff (I screwed up the screen capture, this image has another window in front of it, but just ignore that)
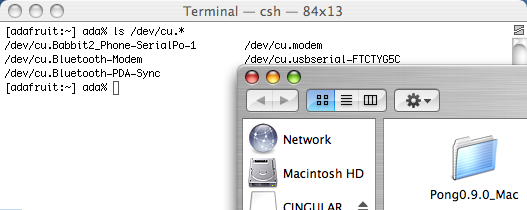
/dev/cu.Bluetooth is the built in bluetooth stuff, dont use that. /dev/cu.modem is the modem (if there is one), dont use that either. What you're looking for is something like /dev/cu.usbserial or /dev/cu.KeySerial1 or something similar. In this case its /dev/cu.usbserial-FTCTYG5U
OK we're at the important part. This is where we actually get around to telling avrdude how to put the data onto the chip. This command is rather complex, but we'll break it down.
<memtype> - can be flash, eeprom, hfuse (high fuse), lfuse (low fuse), or efuse (extended fuse)
r|w|v - can be r (read), w (write), v (verify)
<filename> - the input (writing or verifying) or output file (reading)
[:format] - optional, the format of the file. You can leave this off for writing, but for reading use i for Intel Hex (the prevailing standard )
For example:
- To write a file called firmware.hex to the flash use the command: -U flash:w:firmware.hex
- To verify a file called mydata.eep from the eeprom use the command -U eeprom:v:mydata.eep
- To read the low fuse into a file use the command -U lfuse:r:lfusefile.hex:i
OK enough of this jibber-jabber. Its time to program the firmware into a chip!
Get your AVR target board ready to go, we'll be using an attiny2313 in this example but of course you should substitute the chip you're using (in which case the code will probably not do anything). Make sure the device is powered, either by batteries or a wall plug or by the programmer if the programmer can do it.
Download the test_leds.hex file and place it in C:\ (Windows) or your home directory (Mac)
Figure out what programmer you are using and which port its connected to (in this example I'll be using a usbtinyisp but anything is fine.) Since the usbtinyisp is a USB programmer I can leave off the -P <port> switch.
type in avrdude -c usbtiny -p attiny2313 -U flash:w:test_leds.hex
- If you're using a DT006 parallel bitbang programmer (such as a MiniPOV2) you probably want to use a command like avrdude -c dt006 -P lpt1 -p attiny2313 -U flash:w:test_leds.hex
- If you're using a DASA serial bitbang programmer (such as a MiniPOV3) you probably want to use a command like avrdude -c dasa -P com1 -p attiny2313 -U flash:w:test_leds.hex
- If you're using an STK500 devboard programmer you probably want to use a command like avrdude -c stk500 -P com1 -p attiny2313 -U flash:w:test_leds.hex
- If you're using an AVRISP v2 USB programmer you probably want to use a command like avrdude -c avrispv2 -p attiny2313 -U flash:w:test_leds.hex
- etc...
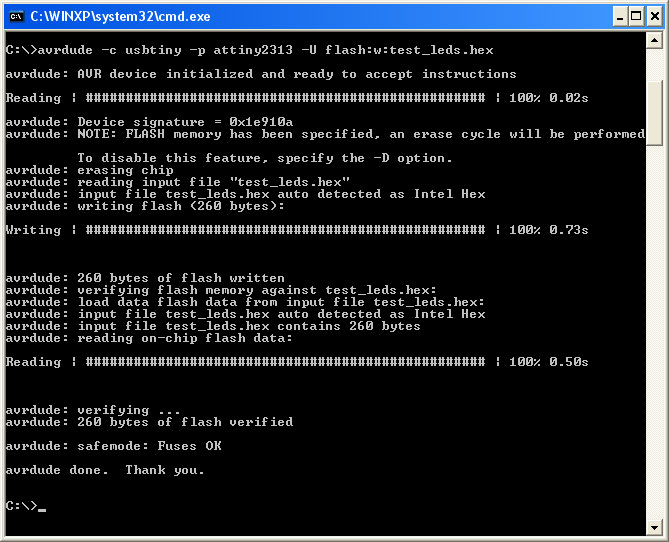
Avrdude should go through the following steps:
- Initializing the programmer (you wont see this if it works)
- Initializing the AVR device and making sure its ready for instructions
- Reading the device signature (0x1e910a) which confirms that the chip you specified in the command line (attiny2313) is in fact the chip that the programmer is connected to
- Erasing the chip
- Reading the file and verifying its a valid file
- Writing the flash
- Verifying the flash
Fuse memory is a seperate chunk of flash that is not written to when you update the firmware. Instead, the 3fuses tend to be set once (altho they can be set as many times as you'd like). The fuses define things like the clock speed, crystal type, whether JTAG is enabled, what the brownout (minimum voltage) level is, etc. For more information on fuses you can read about 'em here.
First you'll want to calculate fuses using the very convenient AVR Fuse Calculator
To program the fuses, use:
avrdude -c usbtiny -p attiny2313 -U lfuse:w:<0xHH>:m
avrdude -c usbtiny -p attiny2313 -U hfuse:w:<0xHH>:m
avrdude -c usbtiny -p attiny2313 -U efuse:w:<0xHH>:m
Where <0xHH> is the desired fuse value, in hex. For example to set the high fuse to 0xDA:
avrdude -c usbtiny -p attiny2313 -U hfuse:w:0xDA:m
Setting the fuses incorrectly can 'brick' the chip - for example you can disable future programming, or make it so the chip is expecting an external crystal when there isn't one. For that reason I suggest triple-checking the fuse values. Then check again, make sure you aren't disabling ISP programming or the Reset pin or setting the clock speed to 32kHz. Then verify again that you have the correct chip for calculation. Then finally you can try writing them to the chip!
Remember: once you set the fuses you do not have to set them again
If the programmer is not properly connected to the chip, you'll get the following message: initialization failed, rc=-1 Double check connections and try again, or use -F to override this check
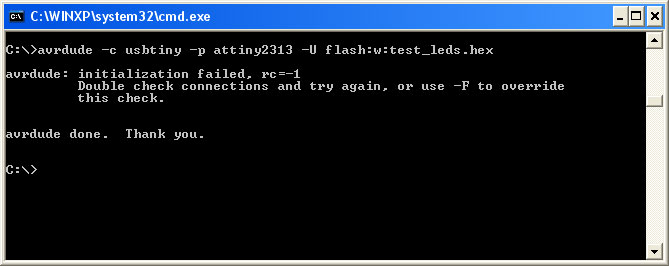
This means that the programmer couldn't talk to the chip. If you are using a "simple" programmer such as a serial or parallel port bitbang programmer, it could mean the programmer is at fault. Otherwise, it usually means the programmer is OK but it couldnt find the chip.
Check that the chip is powered, plugged into the socket or programmer properly, the programming cables are plugged in correctly, the header is wired correctly, etc. 99% of the time, it is a problem with wiring.
Just for kicks try running this command avrdude -c usbtiny -p atmega8 -U flash:w:test_leds.hex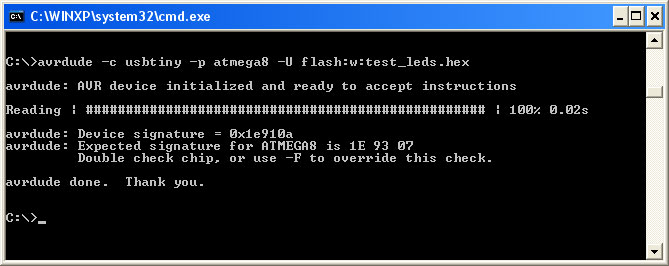
You'll see that it stops at step 2, once the signature is different than the expected one it stops. This is because code that is compiled for an attiny2313 wont run on an atmega8 (this is true of most microcontrollers, the .hex files are not cross compatible)
