How to Remove the Power Steering Pump
1990-1994 Lexus LS400
This job is relatively straight-forward, however, the key to completing it in one shot is to have all the tools beforehand. Ratching-head box wrenches are wonderful for this job. A long handled socket wrench helps for leverage, and six-point sockets are a must if you don't want to round off any bolt heads. I rounded off one of them and had to buy fluted bolt remover sockets in order to finally get it loose.
Tools Needed:
- Pliers
- Screwdrivers
- Sockets and socket wrenches
- Ratcheting box wrenches / box wrenches
Parts/Supplies Needed:
- Rebuilt P/S pump, OR P/S pump rebuild kit
- New copper crush washer for high pressure line
- A few feet of new 3/8" return hose
- 2 hose clamps for new hose
- Optional: bolt to plug ACV (air control valve) hole (labeled IAC in pics below), OR new ACV valve
- Turkey baster OR fluid pump to remove fluid
- Engine degreaser OR brake cleaner
- Shop towels
1) Disconnect battery, remove air intake and engine covers . Follow steps 3-10.
2) Loosen the 17mm nut holding the pulley to the P/S pump. Keep the drive belt on while loosening this nut since it will provide some tension. The nut is threaded normally (righty-tighty, lefty-loosey). I soaked the nut with some penetrating oil for a few minutes before taking a long-handled ratchet and tapping it with a hammer a few times. Using a large screwdriver to stop the pulley from turning was the key to loosening it.
4) Remove the P/S pulley nut and pulley. Torque = 32 ft-lb (440 kg-cm, 43 N-m)
5) Cover the alternator with some rags or a towel to prevent fluid from getting into it.
6) Using a turkey baster or fluid pump, remove as much fluid from the reservoir as possible and then disconnect the return hose, step 2. Be careful shoving a hose into the reservoir because there is a fine metal screen at the bottom of the pump that you don't want to break. If the return hose has never been replaced now is a great time to do so. Just buy a couple feet of 3/8" hose from your local auto store, then fully remove the old hose and cut the new hose to the same length. Use new hose clamps on the return line.

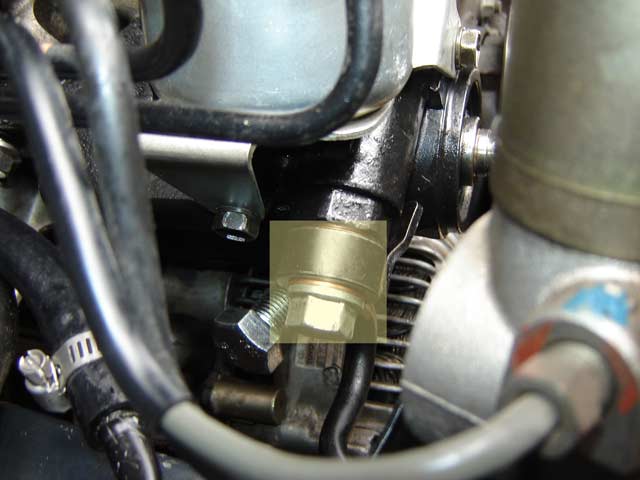
7) Remove the 3 bolts (highlighted in yellow) that hold the P/S pump reservoir on, then remove the reservoir. Torque = 9 ft-lb (130 kg-cm, 13 N-m)

8) Place matchmarks on the lid and reservoir itself then remove the metal lid on the top of the reservoir. There are metal tabs that hold the lid on around the circumference of the reservoir that need to be bent out in order to remove it. Once removed, use engine degreaser or braker cleaner to carefully clean the bronze metal screen towards the bottom of the reservoir. Once finished, allow to dry and replace the lid onto reservoir by aligning your matchmarks and bending the metal tabs back into place. If your rebuilt pump does not come with a reservoir make sure to replace the o-ring on the bottom, apply a little ATF on it before inserting the reservoir into the pump.

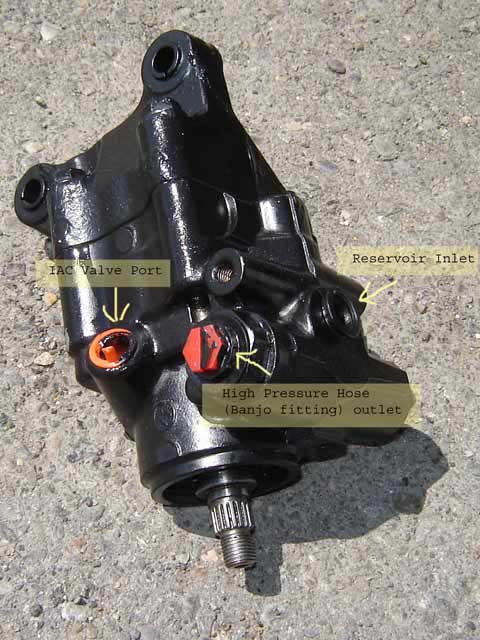
9) Remove the remanufactured pump from the box. By looking closely at this pump, you'll better understand where the bolts that hold it to the engine block are and how the high pressure hose connects to the pump. In the photo below you can see that bolts "3" both go into the side of the engine block and correspond to the two large holes at the top of the photo above. Then there is a nut and a bolt in the front of the pump.


10) Remove the high pressure hose by loosening and removing the bolt holding the hose to the pump. This is a hollow bolt that uses what is known as a banjo fitting. Replace the copper crush washers when reinstalling.
11) Remove the two hoses to the ACV. They're probably pretty old and brittle, so if you plan on using them on the new pump, you'll need to replace them. If not, I just capped them off at the engine block with a cap on both the intake and block and didn't worry about using the ACV on the new pump, it's just not necessary.

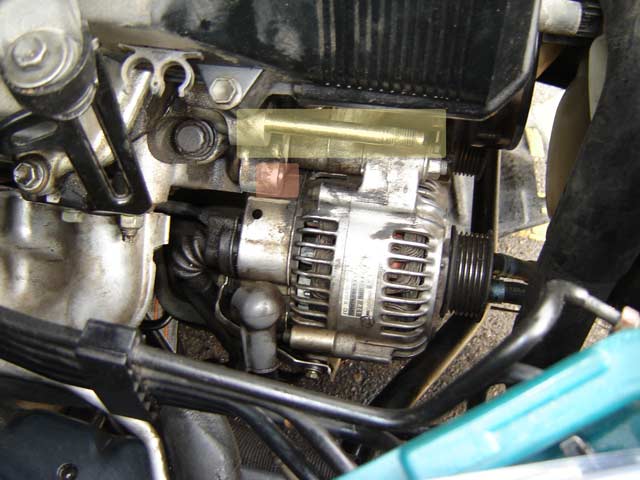
12) Remove the nut on the front of the pump. Then remove the front bolt below that (shaded red). The bolt is tough to see and may be covered in grime. Torque, nut = 32 ft-lb (440 kg-cm, 43 N-m), bolt = 29 ft-lb (400 kg-cm, 39 N-m)

13) Remove the remaining two bolts that hold the pump onto the side of the engine block. These can be tough and its nice to have a long-handled socket wrench or breaker bar to get them loose. Remove the pump by sliding it back off the bolt shaft (highlighted in yellow in step 12). Torque = 29 ft-lb (400 kg-cm, 39 N-m).
14) At this point you need to either rebuild your current pump, or clean it up enough so you can return it for the core credit. Clean up the engine area as well.

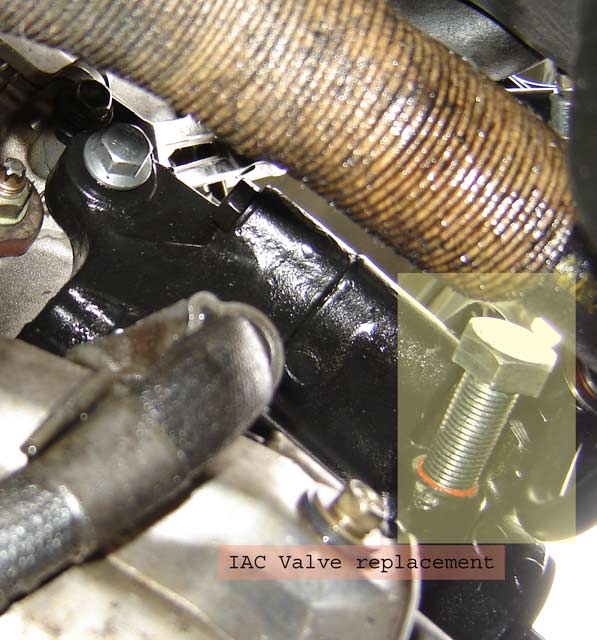
15) Now, with the pump still removed, you need to decide if you're going to replace the ACV or do without it and plug the hole. This valve is supposed to make the steering more smooth or something like that. However, most people don't even notice the difference. And in fact, pumps on Lexus SC's don't even have this valve as you can see in the pump rebuild tutorial. So, I say plug the hole since it's fairly expensive and not necessary.
Remove the ACV from the pump. Take the ACV to your local hardware store and find an identically threaded and sized bolt to plug the ACV hole on the pump. Just for good measure I threw some high-temp RTV silicone on the threads of the bolt to be sure it wouldn't leak. Remove the two hoses that used connect to the ACV prongs and cap off the locations on the block and intake.
16) Install of the rebuilt pump is reverse of removal.
17) If you're not going to clean the solenoid, fill the reservoir with new ATF.
18) Flush the steering system and remove any air in the system.
Lexls.com Notes: Thanks for the pictures!
If you found this information useful please support the site by clicking the button below and making a donation. Thank you.
